The Case for Automated Machine Learning
I’m gonna start with an inconvenient truth: Machine learning is hard. It used to be harder though, and I feel like ML is getting more and more accessible each day. But acquiring the right background needed to understand what’s going on under the hood of PyTorch or scikit-learn or whatever library you happen to be using is, well, still hard. It requires a lot of work, as the brilliant A Super Harsh Guide to Machine Learning likes to remind us:
First, read f***ing Hastie, Tibshirani, and whoever. Chapters 1-4 and 7-8. If you don’t understand it, keep reading it until you do.
You can read the rest of the book if you want. You probably should, but I’ll assume you know all of it.
Take Andrew Ng’s Coursera. Do all the exercises in Python and R. Make sure you get the same answers with all of them.
Now forget all of that and read the deep learning book. Put TensorFlow and PyTorch on a Linux box and run examples until you get it. Do stuff with CNNs and RNNs and just feed forward NNs.
Once you do all of that, go on arXiv and read the most recent useful papers. The literature changes every few months, so keep up.
Long story short, you need to invest significant effort just to understand what’s going on, what you can and cannot do. And then, once things start to make sense, you need to work twice as hard just to keep up with all the research being published all the time. Researcher Mario Krenn recently tweeted about this very issue.
The number of monthly new ML +AI papers at arXiv seems to grow exponentially, with a doubling rate of 23months.
— Mario Krenn (@MarioKrenn6240) October 9, 2020
Probably will lead to problems for publishing in these fields, at some point. pic.twitter.com/dI4dc7s5pD
“But what if” — you’ll say — “what if we could outsource this whole machine learning thing, at least partially? What if it were somebody else’s problem?” That would be nice, wouldn’t it?
Just imagine, handing over to someone whatever data you managed to gather, going to bed with a grateful heart, and waking up the next day to a shiny new trained-and-tested model, ready to be deployed and integrated and whatnot. Gee, that would be absolutely splendid 😱 wouldn’t it?
Well, apparently, other people — engineers, no doubt about it – thought the same thing, and decided to solve this problem once and for all. You know how they like to automate this and that, so it was only a matter of time before they automated machine learning too — from Wikipedia:
Automated machine learning (AutoML) is the process of automating the process of applying machine learning to real-world problems. AutoML covers the complete pipeline from the raw dataset to the deployable machine learning model. AutoML was proposed as an artificial intelligence -based solution to the ever-growing challenge of applying machine learning. The high degree of automation in AutoML allows non-experts to make use of machine learning models and techniques without requiring becoming an expert in the field first.
It goes on.
Automating the process of applying machine learning end-to-end additionally offers the advantages of producing simpler solutions, faster creation of those solutions, and models that often outperform hand-designed models.
Wow. Models that often outperform hand-designed models?!? Well, sign me up with my main email! This is what we’ve been looking for isn’t it?
The truth is, there are several tools & libraries & online services that promise to help in this regard: H2O.ai, Microsoft’s Automated Machine Learning, Google’s AutoML, auto-sklearn, TPOT, and Auto-PyTorch to name just a few. Each one with its own strengths and weaknesses, depending on your particular needs and background. Comparing them is somewhat outside the scope of this article, but I strongly suggest you give a try to at least a few of them and see how they stack up against each other.
For me, my current personal favorite is Automated ML — a cloud service-slash-library that acts like a recommender engine, looking at your data, checking its quirks and stats and whether it can work around them or not by, say, imputing or normalizing fields. It then uses those inputs to recommend a series of ML algorithms, selecting the best-performing one in the process. Let me show you how to use it.
Using Azure Automated Machine Learning
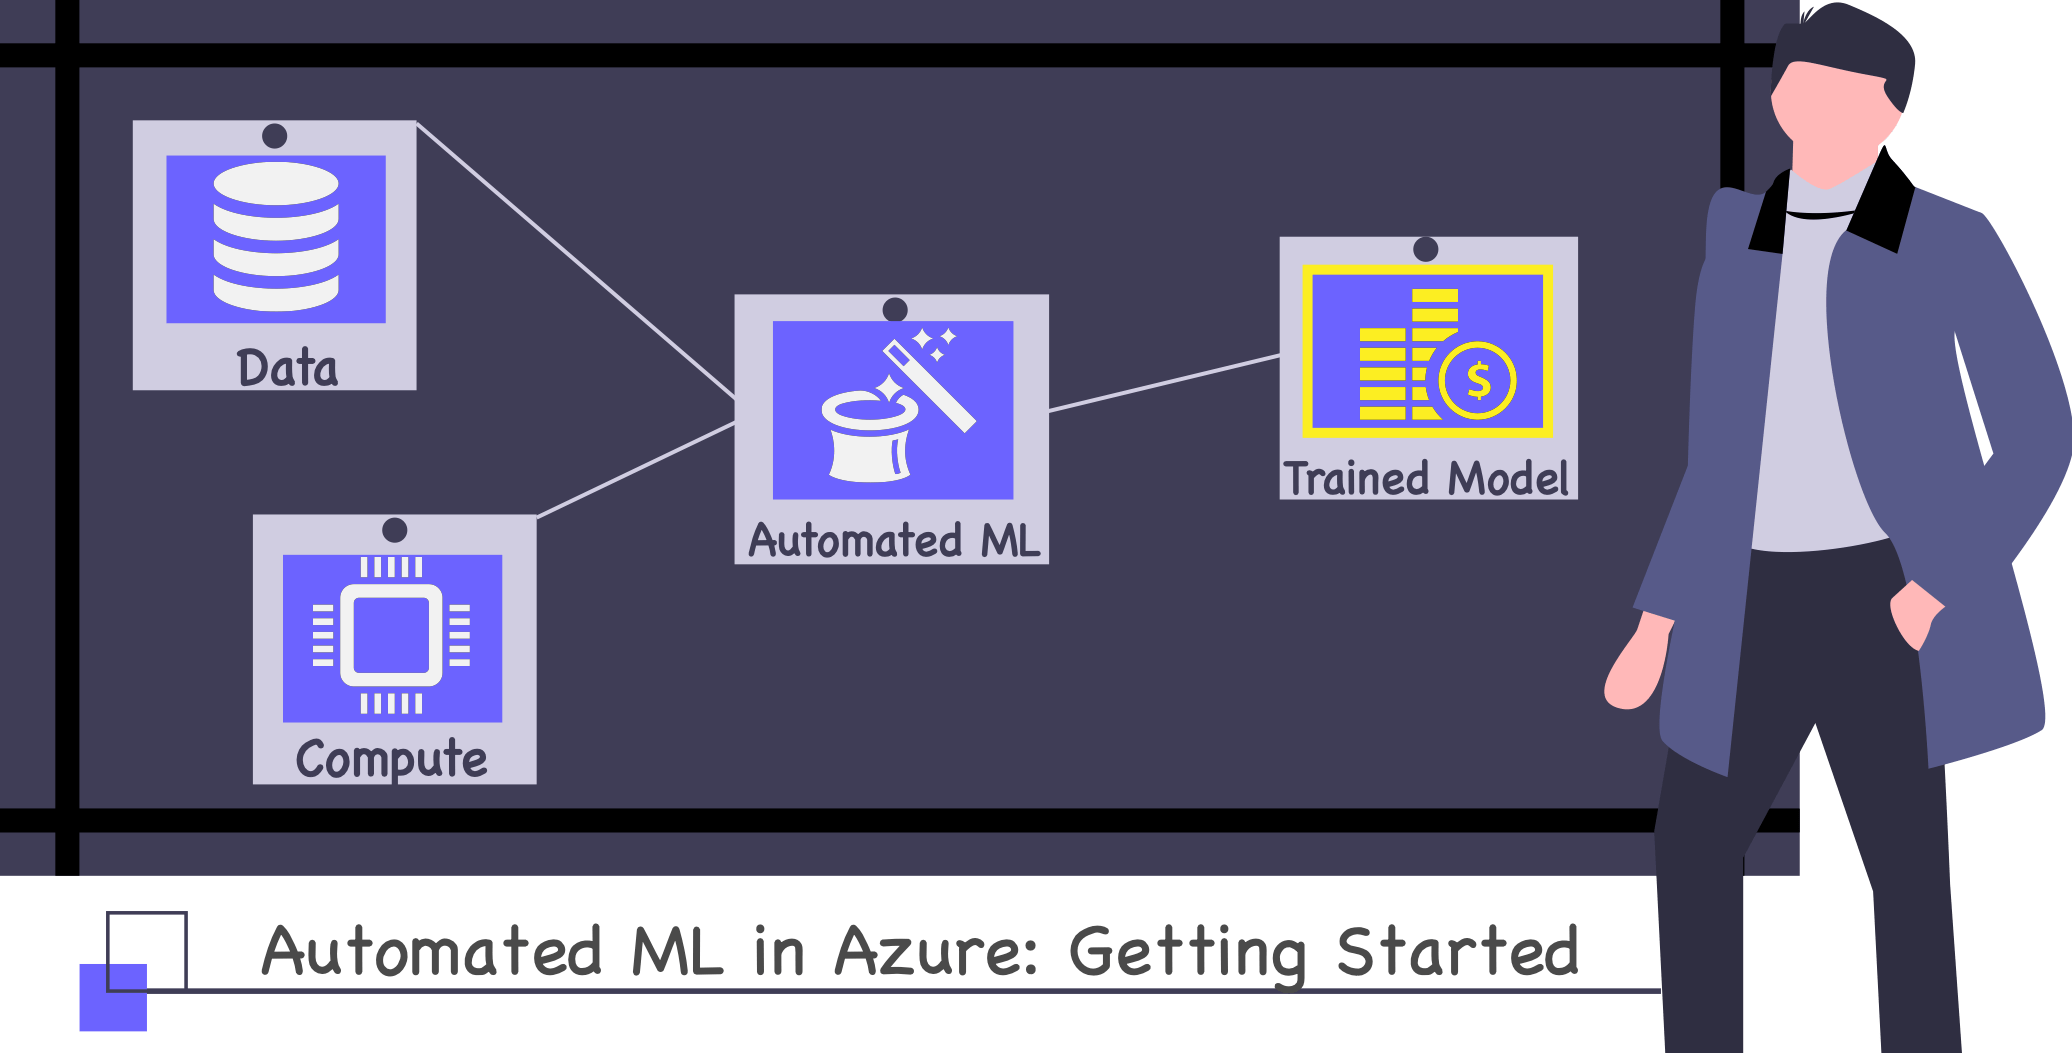
At a high level, all auto ml needs is some labeled data and a computer to run on, and this can be either your local computer or some machine in the cloud. Something like in the image below.
Once started, Automated ML will use the compute you hand it over to run multiple experiments on your data, trying out various combinations of algorithms & hyper-parameters, until it trains a good-enough model, which you can then use and integrate in whatever app you might be building.

This translates basically to the following checklist, of which the first step is to get the data.
- 🗄 Get the Data
- 💻 Find a Compute(r)
- 🤖 Run Automated ML
- 💰 Profit
First things first though. As we all know, machine learning doesn’t exist in a vacuum - we need to have a higher purpose for this whole “get the data train the model” thing. For example, let’s say we’re building a startup focused on real-estate investments, and a crucial functionality is the ability to forecast house prices for different cities, blocks, etc. This sounds like a great opportunity to use machine learning, maybe even add a bit of blockchain for good measure 😋. This should be good enough to secure an initial round of funding, and then we’re off to the races.
Incidentally, this vision helps us start with the most difficult part of this process - finding and assembling the data. In order to automagically train a model that can forecast house prices, we need a dataset with house prices. Luckily, there are such open datasets, including the one from Kaggle’s famous House Prices: Advanced Regression Techniques competition. We could use that, but since we’re not interested competing we can go directly for its source, the entire Ames dataset. From the description:
This paper presents a data set describing the sale of individual residential property in Ames, Iowa from 2006 to 2010. The data set contains 2930 observations and a large number of explanatory variables (23 nominal, 23 ordinal, 14 discrete, and 20 continuous) involved in assessing home values.
Looks good, let’s use it! Using it instead of the one provided by Kaggle should give our model twice the data to train on, which in turn should yield better results. One thing you should not do though, is train a model using the entire Ames dataset, and use it to compete in the House Prices competition. That just spoils the fun for everyone.
Anyways, now that we’ve found a training dataset, we’re ready to start using Automated ML. You will need an Azure subscription, along with an Azure Machine Learning Workspace before you continue.
Registering a Dataset
What we’re gonna do first is load our dataset in Azure Machine Learning to be able to reference it later. We’ll do that by going to Azure Machine Learning Studio and choosing to Create a dataset from web files from the Datasets menu.
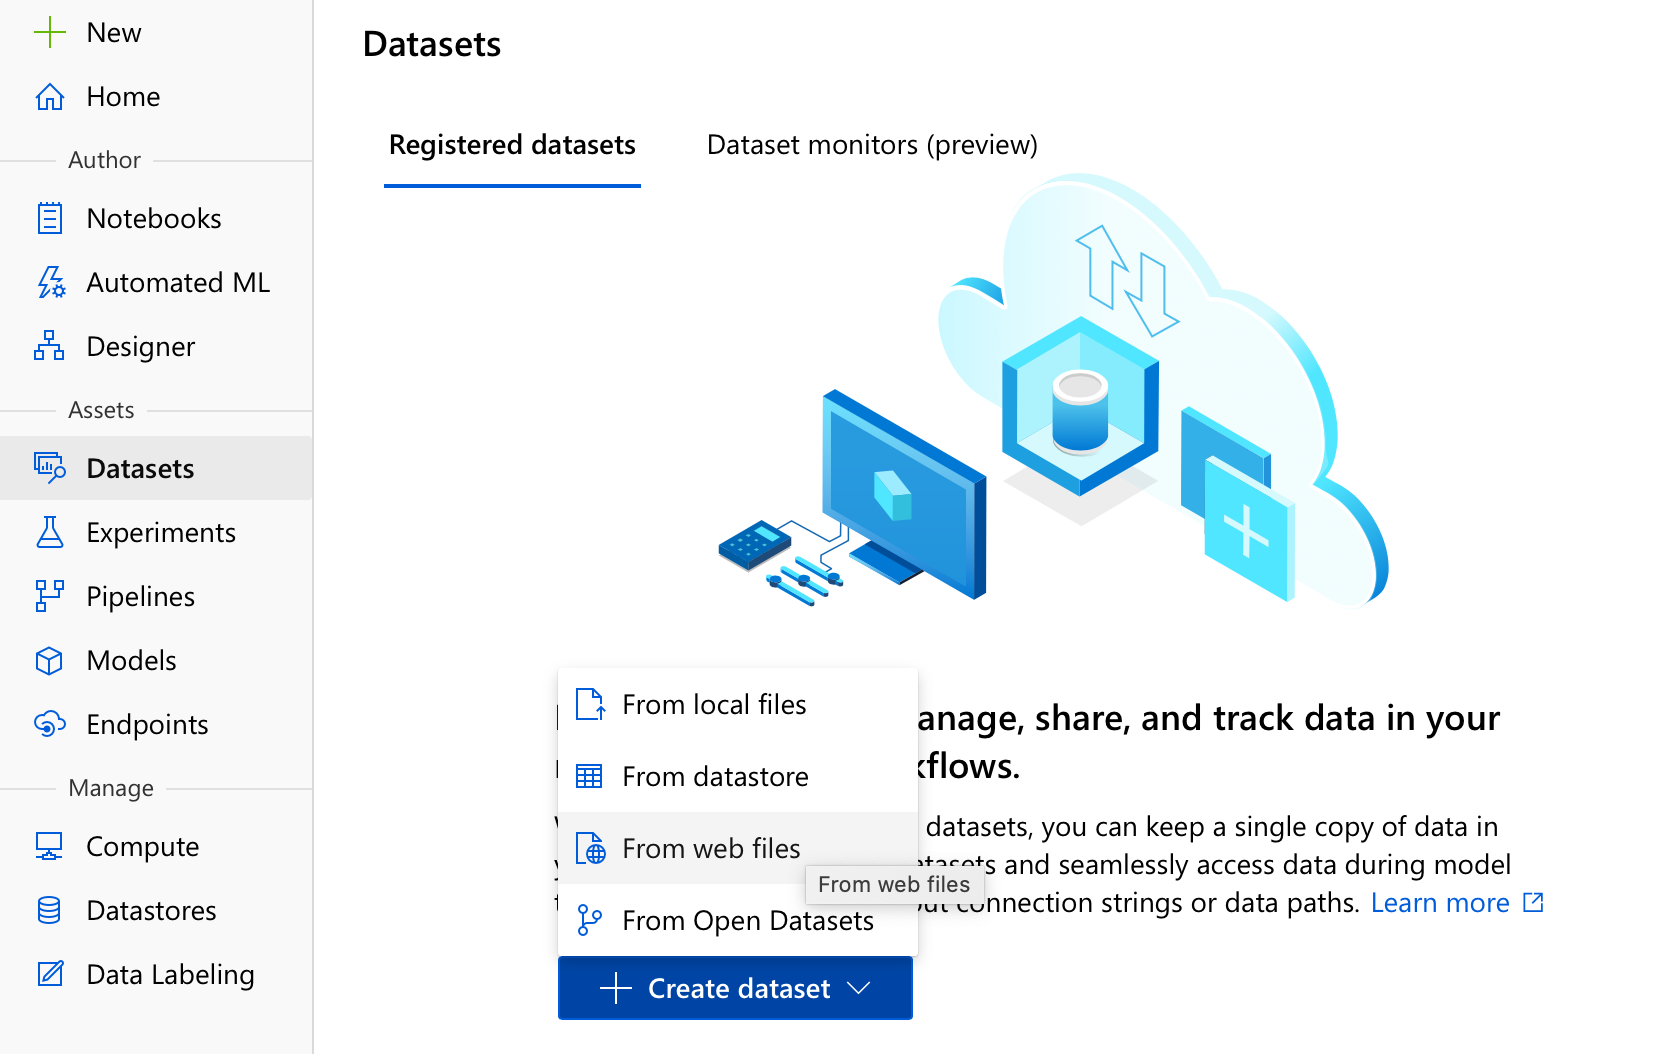
This is the simplest option really, you could also have uploaded the dataset from your computer, or referenced a dataset already uploaded on our datastore (we’ll get to what this means in a moment). All you need to do now is enter the dataset’s address (in our case it’s http://jse.amstat.org/v19n3/decock/AmesHousing.txt), pick a good name (NotAmesHousing is always a winner in my book), and make sure the type of the dataset is Tabular and not some other option like File .
Now that we’ve told Auto ML where the data is, we need to also describe it a little. It should deduce itself that this is a tab-delimited file, encoded as UTF-8, but it most likely won’t know to read the first row as headers. Because who puts the headers in the first row, right? Anyways, make sure to set the Column headers as Use headers from the first file, which works even though in our case the first file is the only file. You’ll also get the chance to review the data, and make sure it’s parsed correctly (ignore the Id field column, that’s just there to tell you the row number, it won’t get added to the dataset).
The next step is a bit more challenging.
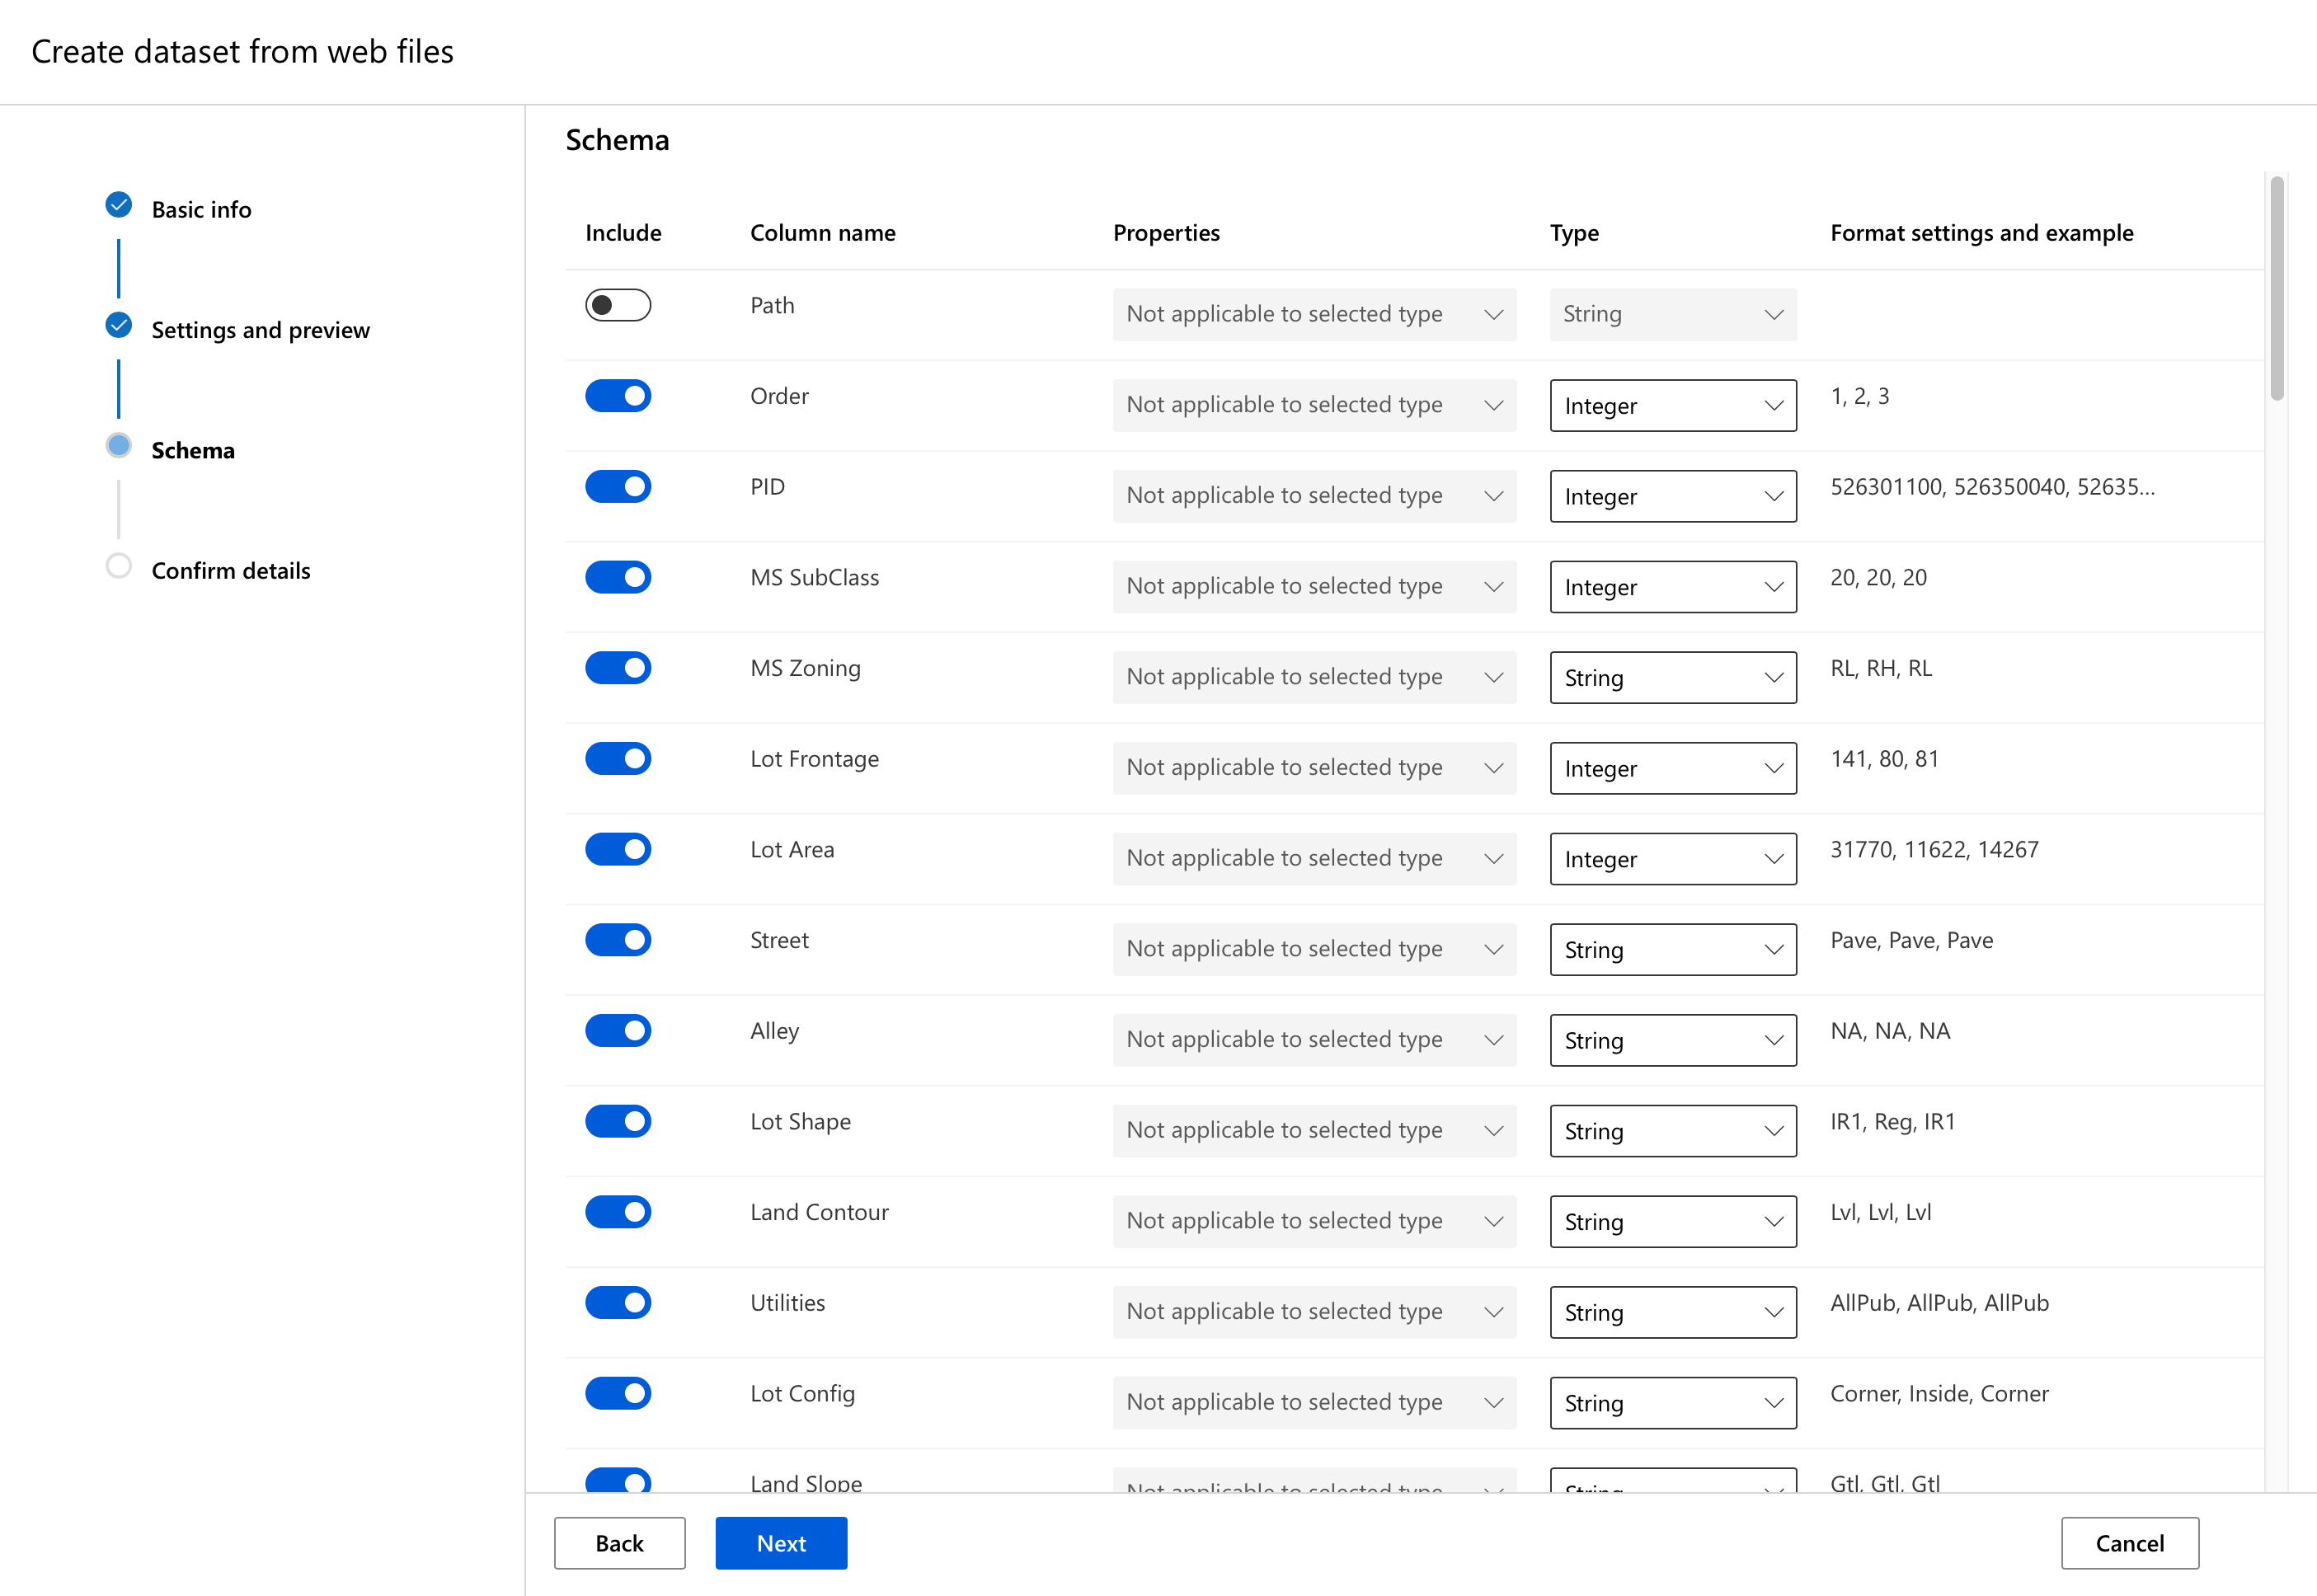
You’ll probably be wondering what’s with the Path column, since this wasn’t mentioned anywhere so far? Actually that would be useful if we had imported several files, each with its own path, but with just one file it’s rather useless. You can leave it unchecked, while all other columns should be left checked. Except maybe PID, that looks useless - it’s the Parcel Identification Number, as per the Data Documentation. Let’s leave it in though, and see if Automated ML can figure that out by itself.
In the end, your settings should look like this:

We won’t look at profiling datasets today, but you should know that checking this will calculate statistics such as mean, standard deviation, etc. for your entire dataset, as opposed to just getting them for a smaller subset. This won’t be needed for now, and we’ll be able to generate profiling data later on anyway.
And that’s it 🎉! We now have a dataset, ready to be parsed and processed and used for training. The only thing standing between us and a bathtub full of VC money is finding out a way to run this auto ml thing - and we’ll do just that by configuring a compute resource.
Let me just quickly update the checklist, I love crossing things off of checklists 🙂:
- 🗄
Get the Data - 💻 Find a computer
- 🤖 Run Automated ML
- 💰 Profit
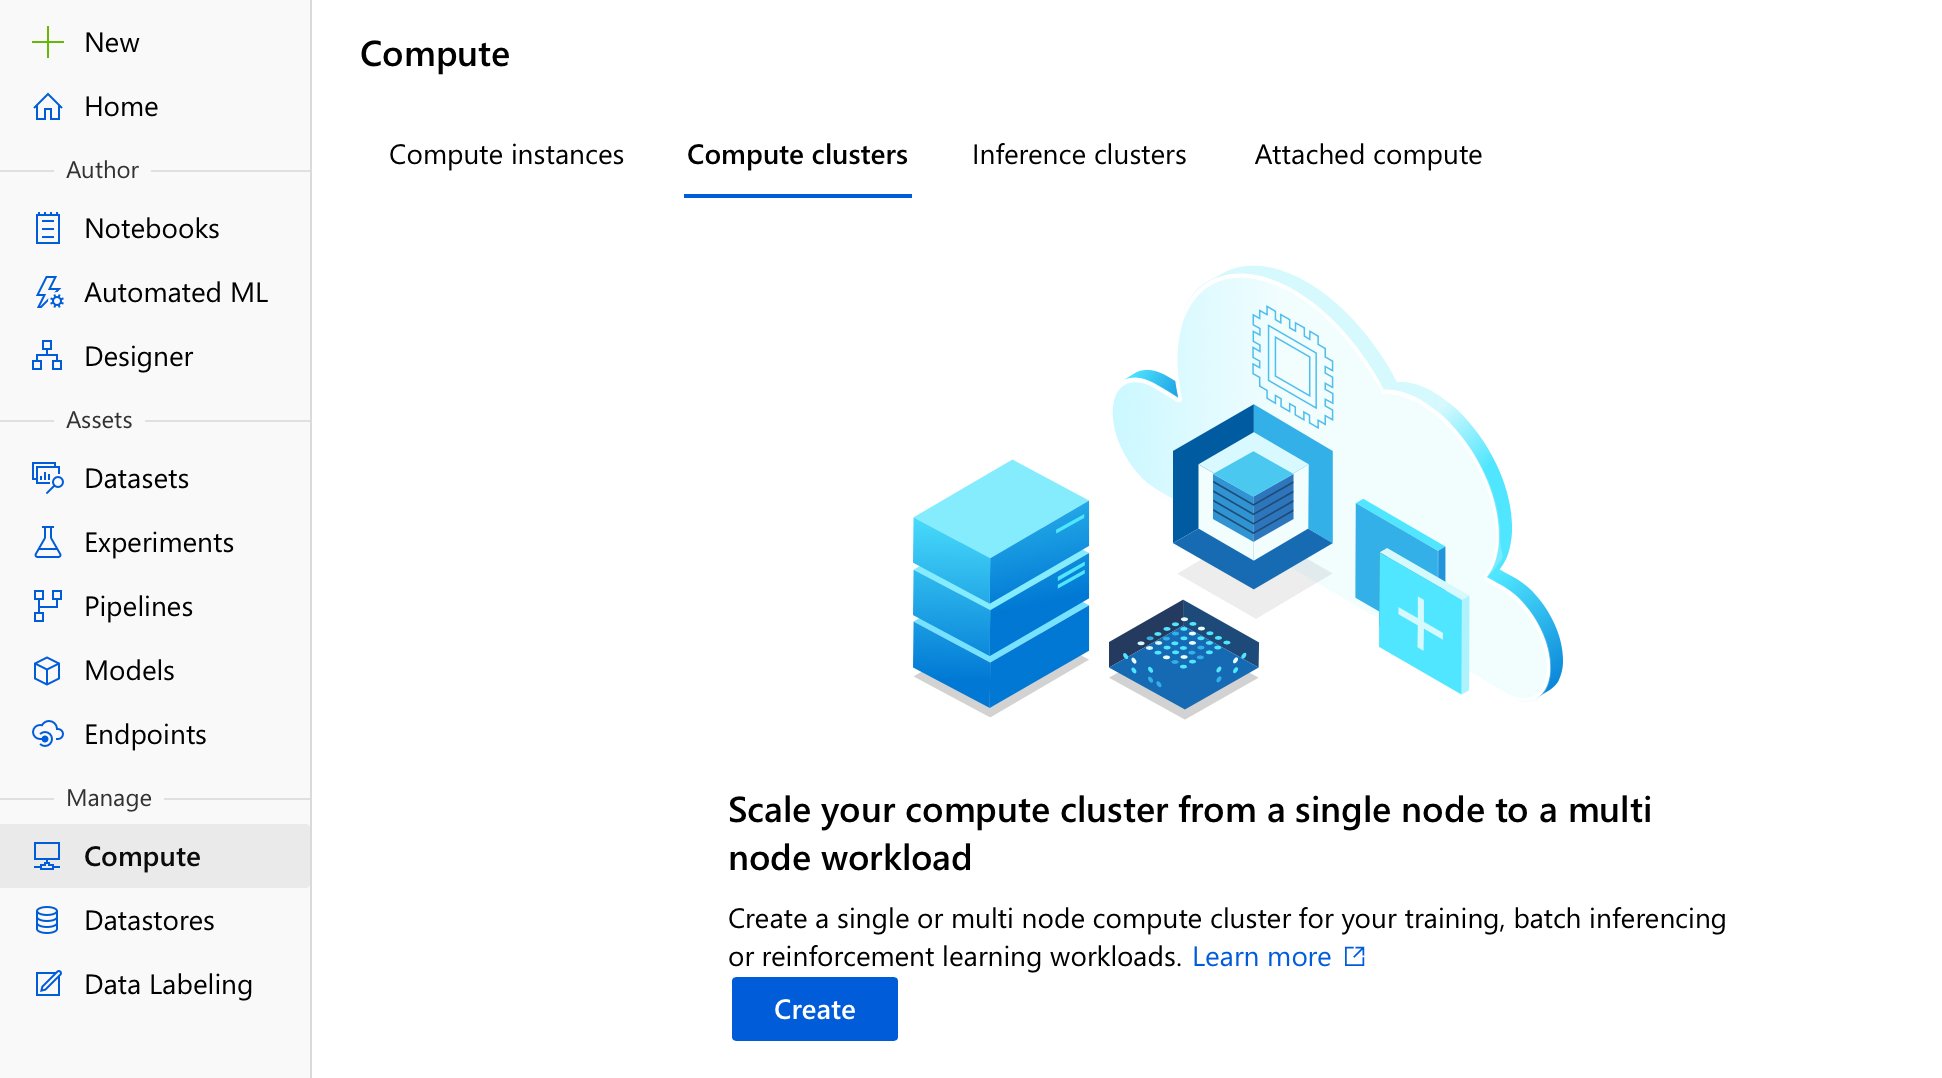
Configuring a Compute Resource
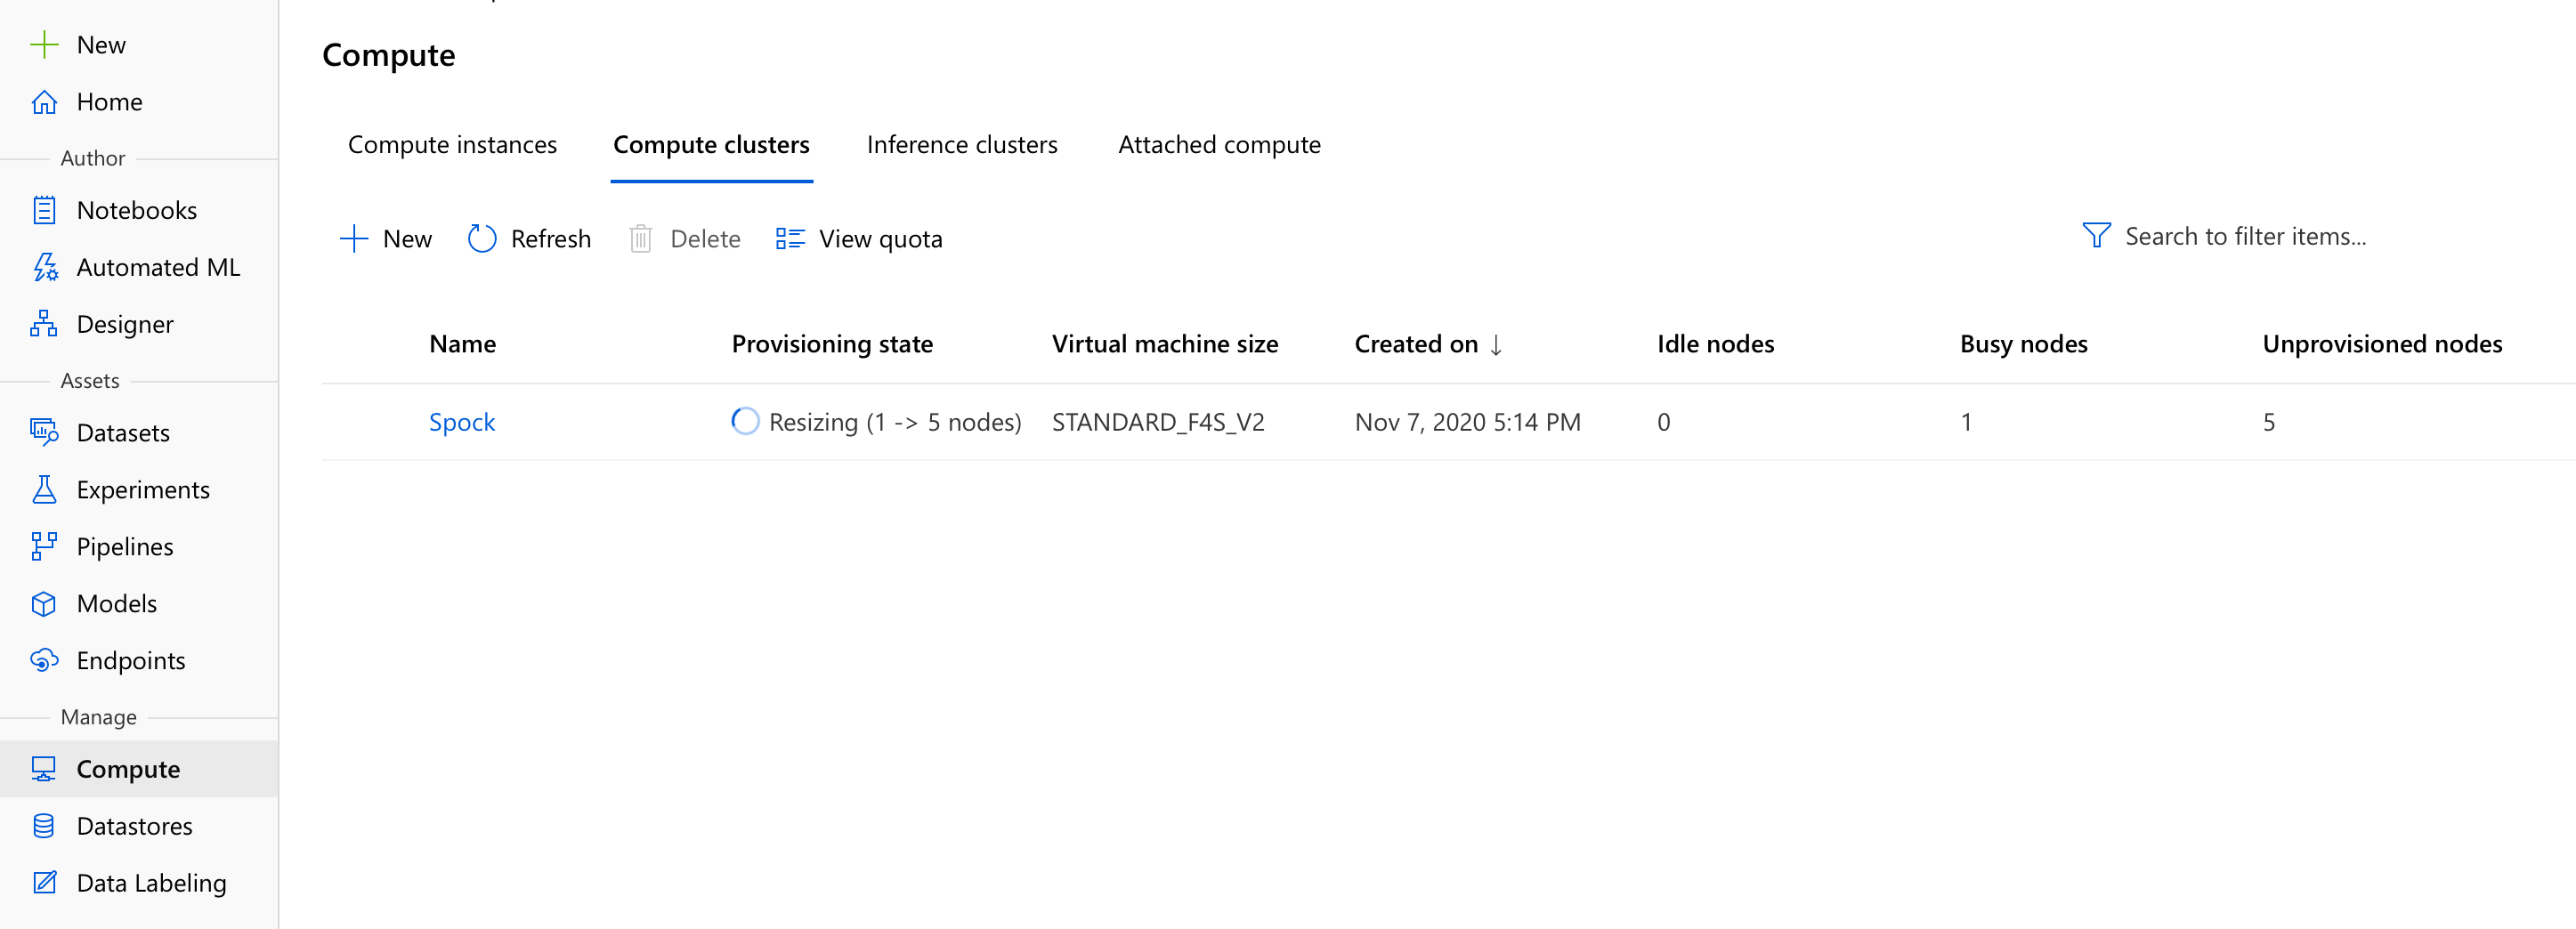
Configuring a new compute in Azure ML is quite easy actually - what we need here is a Compute cluster. As you can see below, in the Compute menu you can create several types of compute, such as compute instances (useful for running notebooks in the cloud), inference clusters (useful for running your trained models and making predictions with them), and also attached compute (a bring-your-own-compute deal, in which you can attach existing HDInsight or Databricks clusters even virtual machines, and use them as compute targets). We’ll stick to an Azure-managed Compute cluster though.
We’ll need to pay some attention to the next step here, since the compute size can and will significantly influence the time (and implicitly money) Automated ML needs to spend in order to train a good model.
Looking at our data, at 2930 rows and 82 columns this won’t take up that much RAM to load and process, so we can ignore RAM and focus on getting the best CPU we can afford. In our case this means something from the compute-optimized Fsv2-series of machines, I went for Standard_F4s_v2 myself. Looking at the specs, it offers the same CPU performance as the default, general purpose Standard_DS3_v2 machine, but at a 30% discount (you can check the pricing here, too). Not too shabby, if I do say so myself.
You could also go for an even faster machine, but that will fill up your core quota and you won’t be able to start as many VMs in parallel. And generally you want to start as many VMs in parallel as possible, in order to allow Auto ML to explore as many options, as fast as possible.
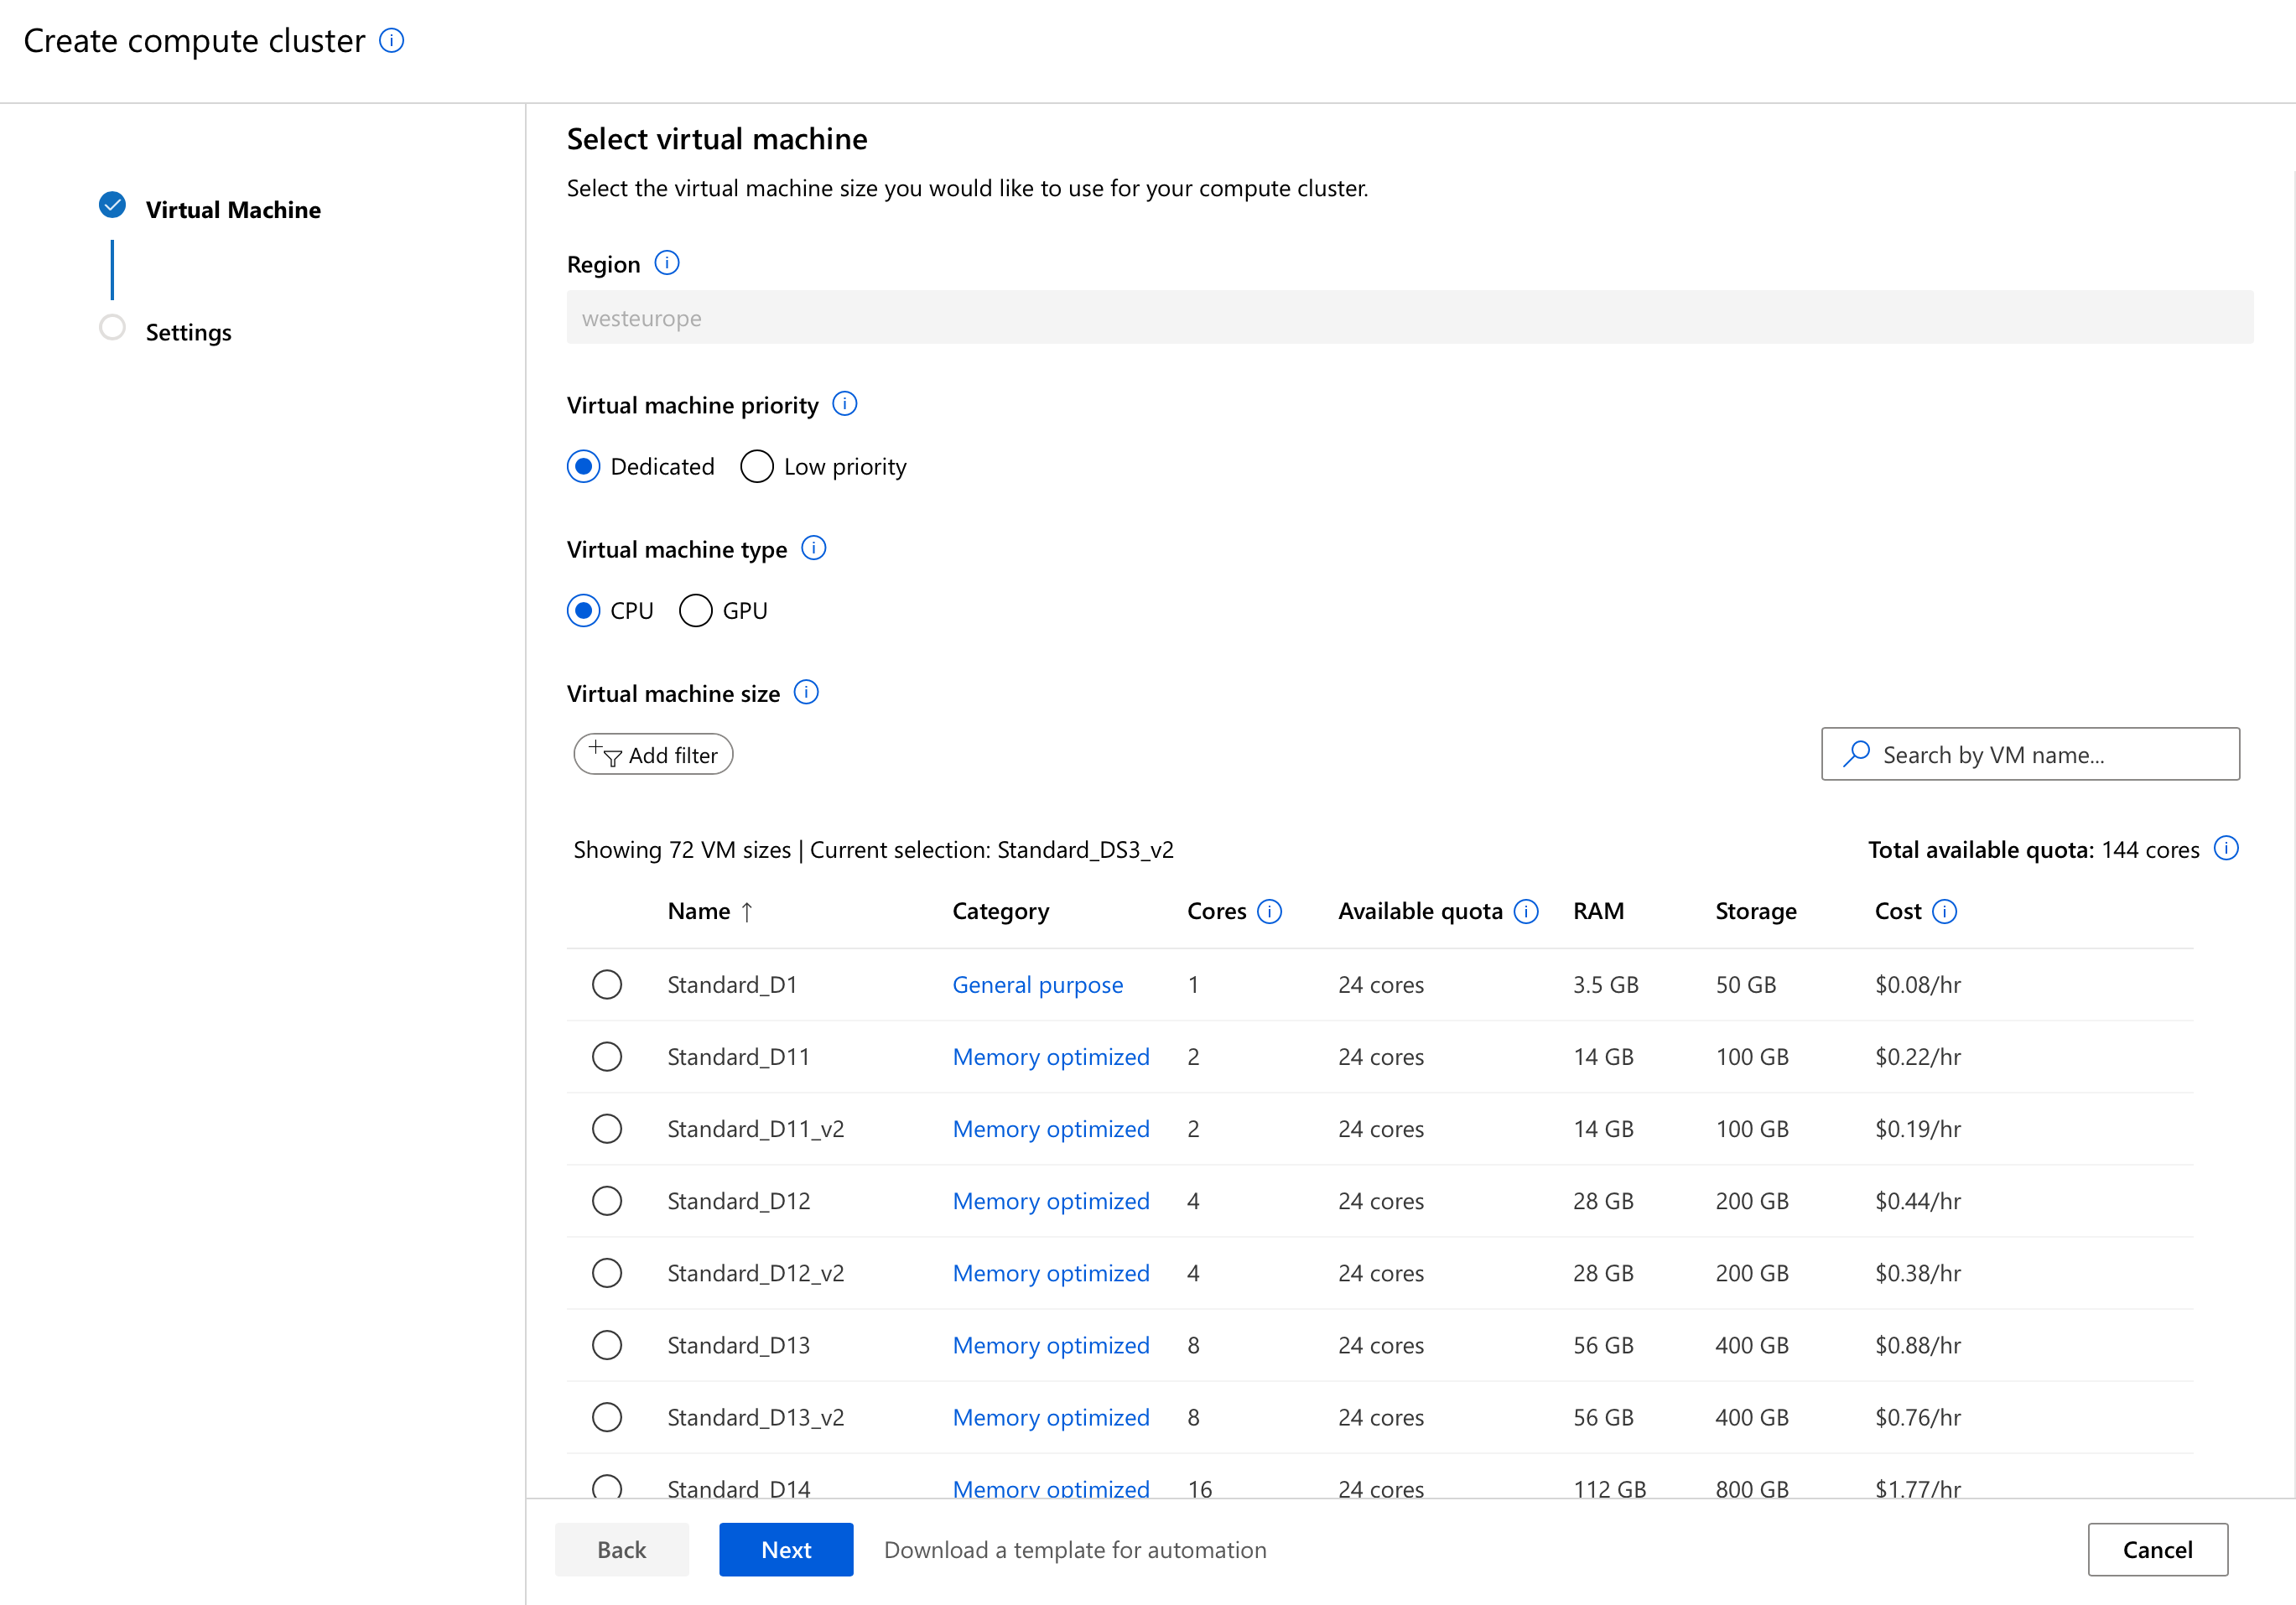
Once you select the best machine money (and quota) can buy, you only need to give it a good name (I named mine Spock 🤓) and select a minimum and a maximum number of nodes. Considering our Automated Machine Learning scenario, I’d set the minimum to 0 (we don’t want to pre-allocate and implicitly pay for VMs if we’re not gonna use them), and the maximum to whatever our quota allows (for Standard_F4s_v2 and my quota of 24, that means 6 nodes). As I said before, the more nodes we can allocate the faster Automated ML will train a suitable model.
We’re making good progress so far:
- 🗄
Get the Data - 💻
Find a computer - 🤖 Run Automated ML
- 💰 Profit
Automated Machine Learning
This is the fun part - we’ll start off by going to the aptly named Automated ML menu, and choosing to create a new Auto ML run. We’ll select our dataset, and then configure a few options:
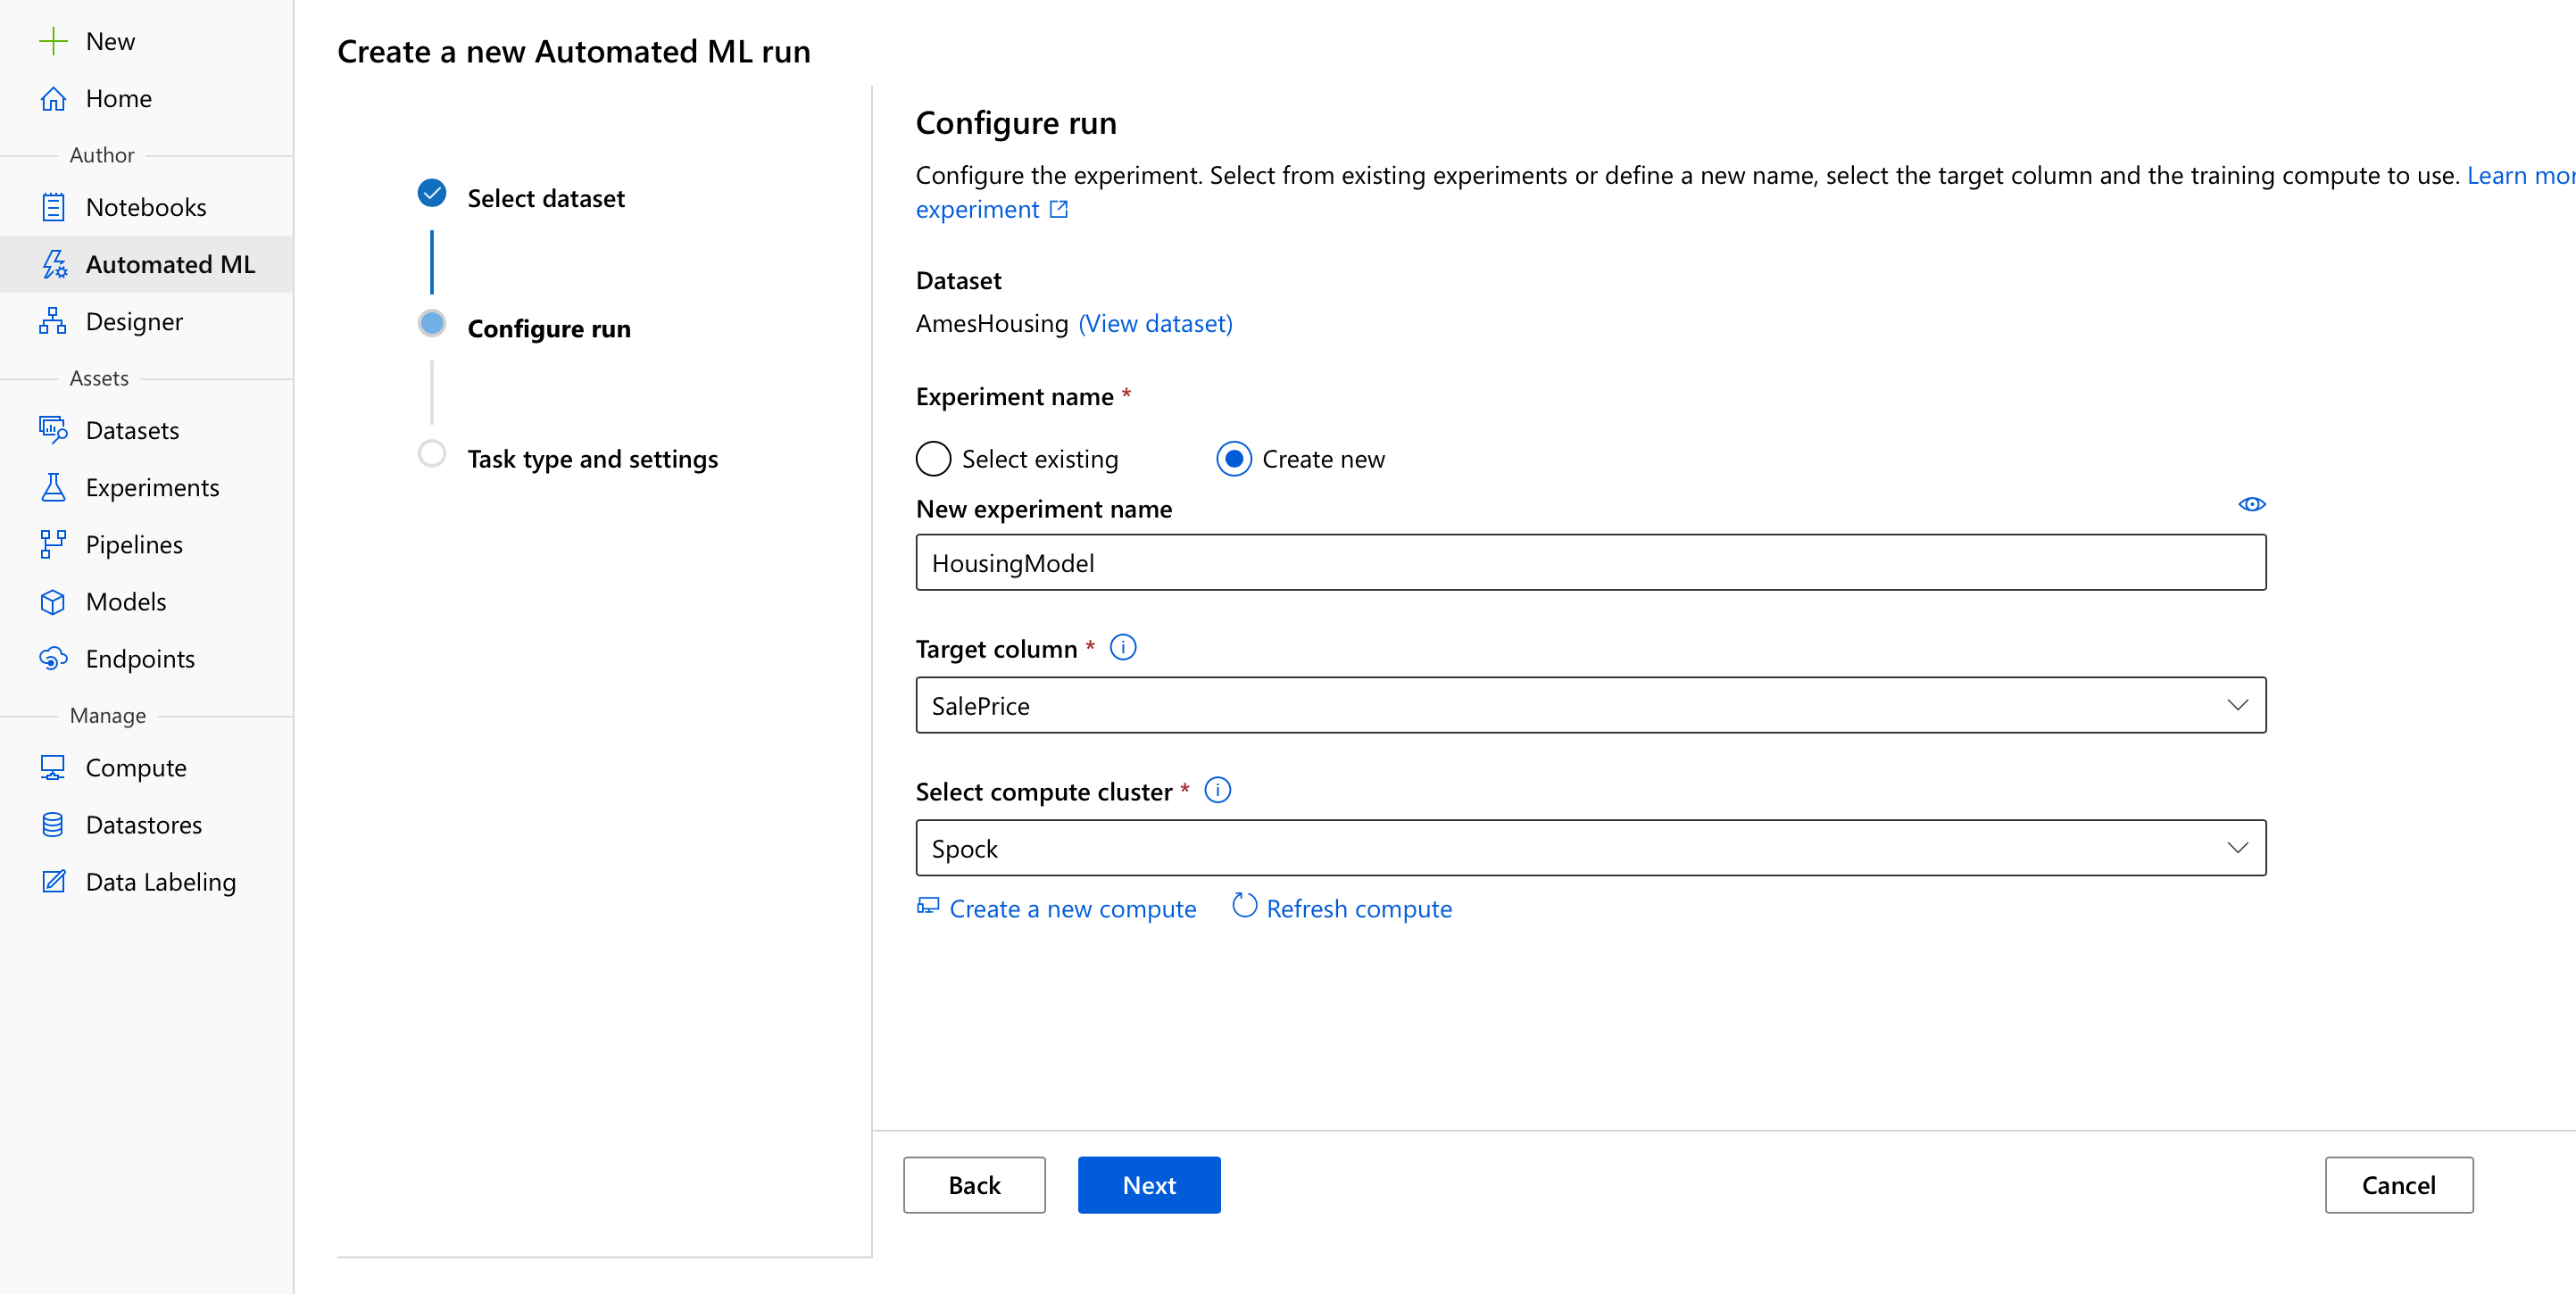
Don’t worry too much about having to create a new Experiment, that’s just the entity Azure ML uses to group Runs (and don’t worry too much about what a Run is either, we’ll talk about that some other time 😅). We’ll need to tell Automated ML which column to predict - SalePrice, and on which compute resource to run - Spock.
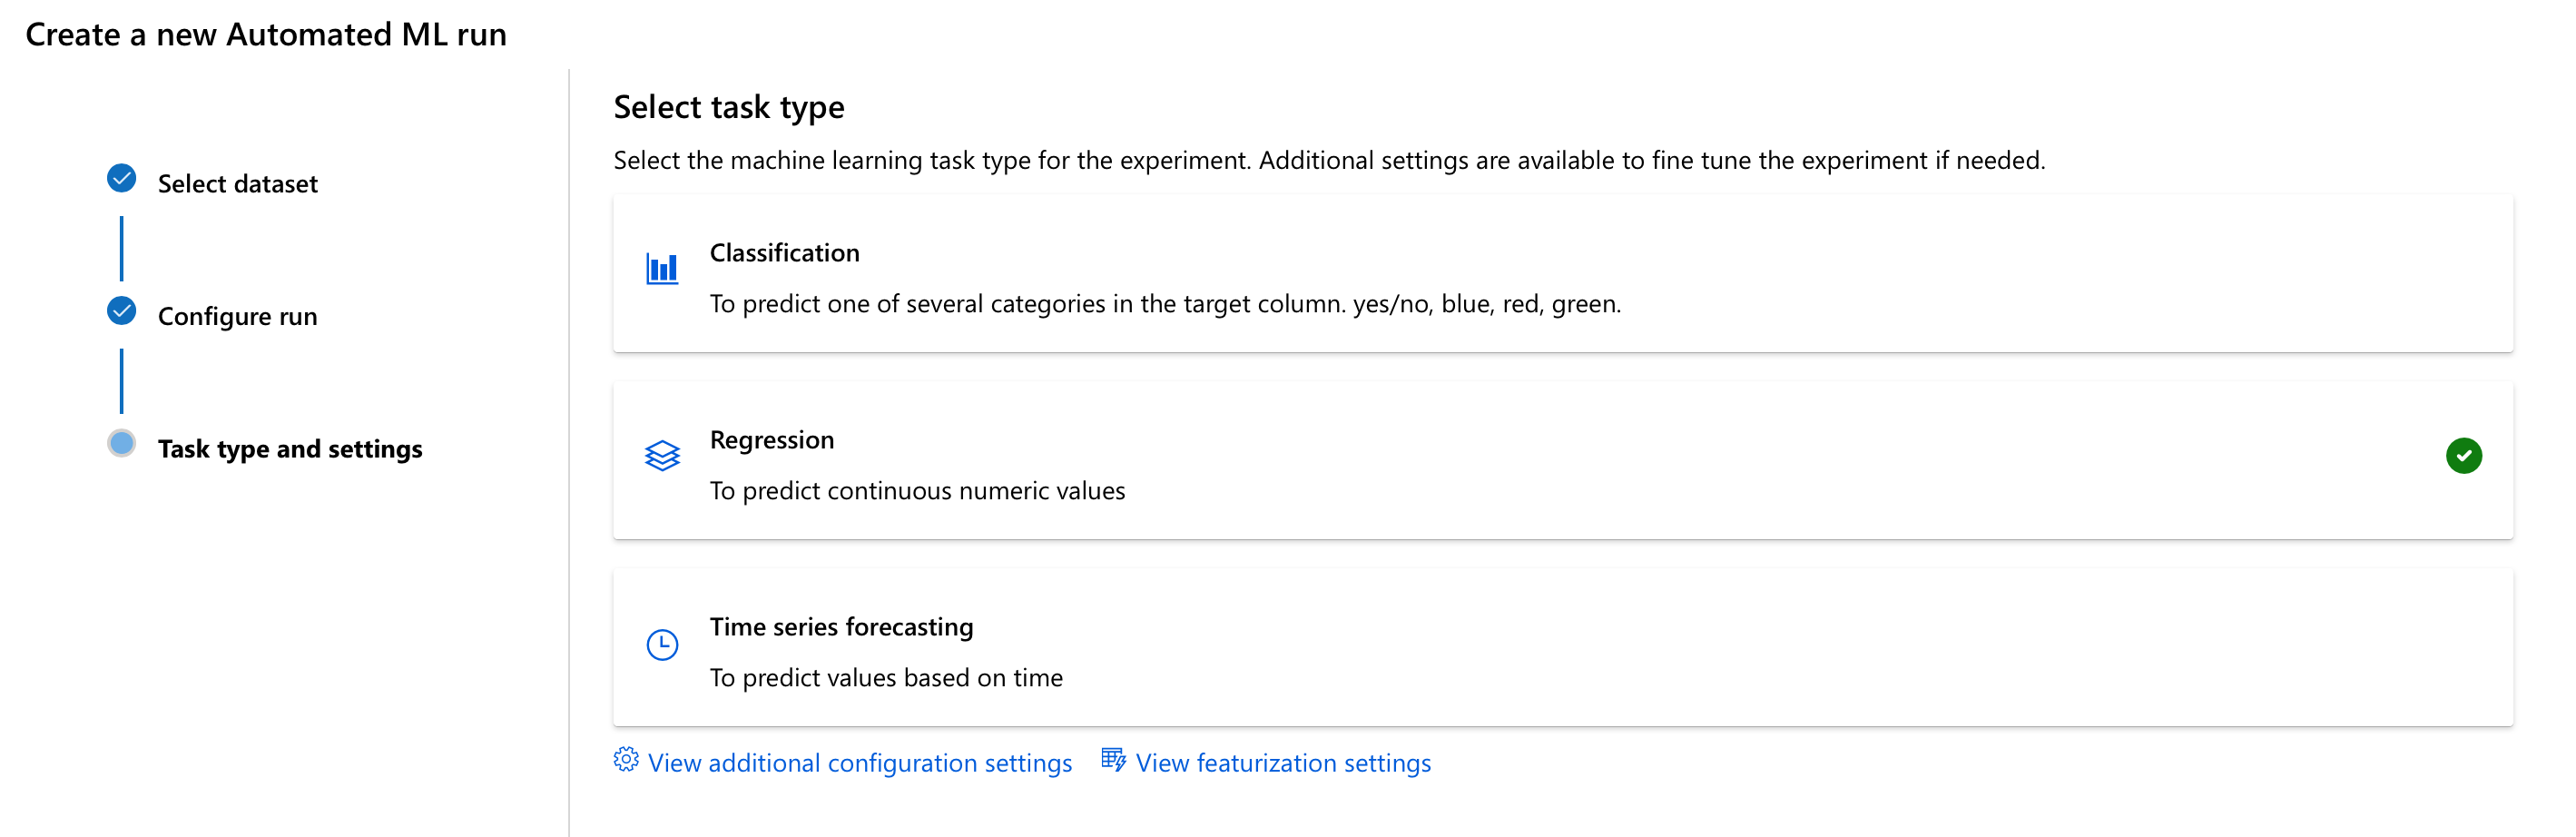
Next up, we’ll need to tell it what kind of problem we’re facing - do we need to predict a category (Classification), a continuous numeric value (Regression), or something based on time (Time series)? Now, we know that we want to predict house prices, which is to say numeric continuous values, so we’re gonna go for Regression.
We also have the change to fine-tune Automated ML’s configuration settings, which control how it approaches the whole find-a-good-model-and-then-stop process, and its featurization settings, which control how it transforms the data. We’ll only look at the configuration settings for now.
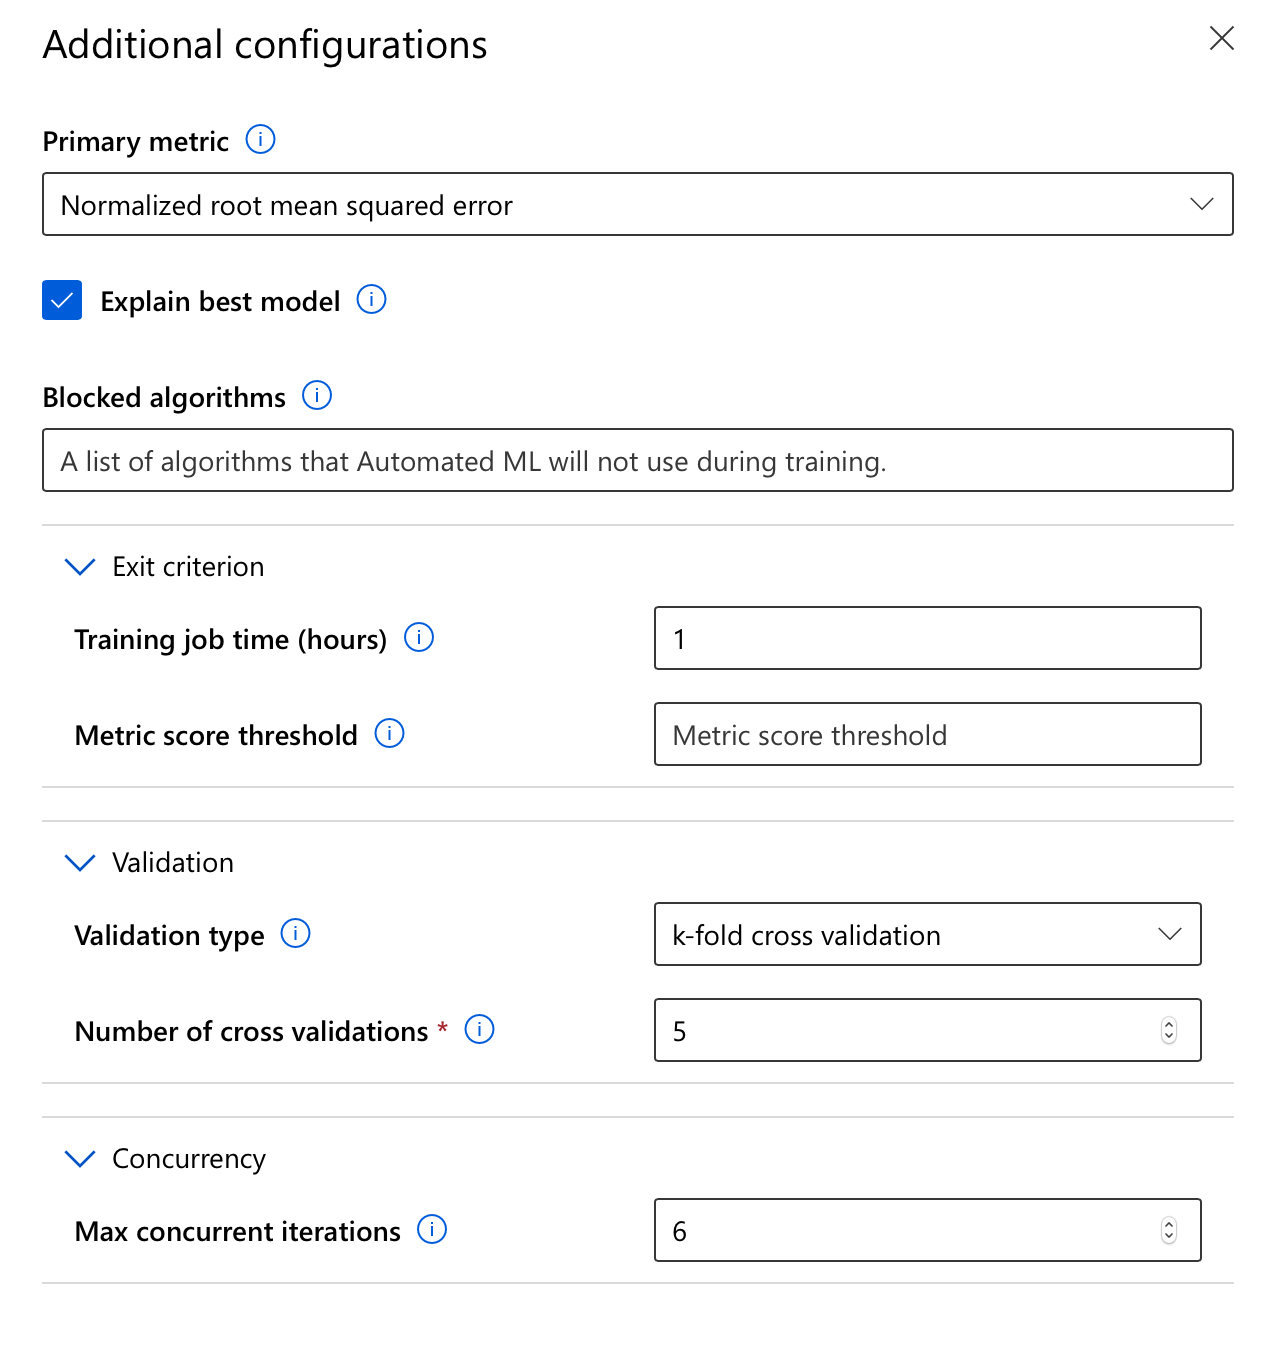
In my case, I’ve chosen to evaluate the automatically trained models using Normalized root mean squared error, since I want to be able to know how far off my predictions are. I don’t want Automated ML to take more than one hour to find a suitable model, because I want my costs to be really predictable. I want to evaluate the models using a 5-fold cross validation to make sure it’s not overfitting my data, and finally, I want to evaluate as many models as possible so I chose to have 6 concurrent iterations (remember, that’s the maximum for my compute quota), effectively enabling it to try out 6 potential models in parallel.
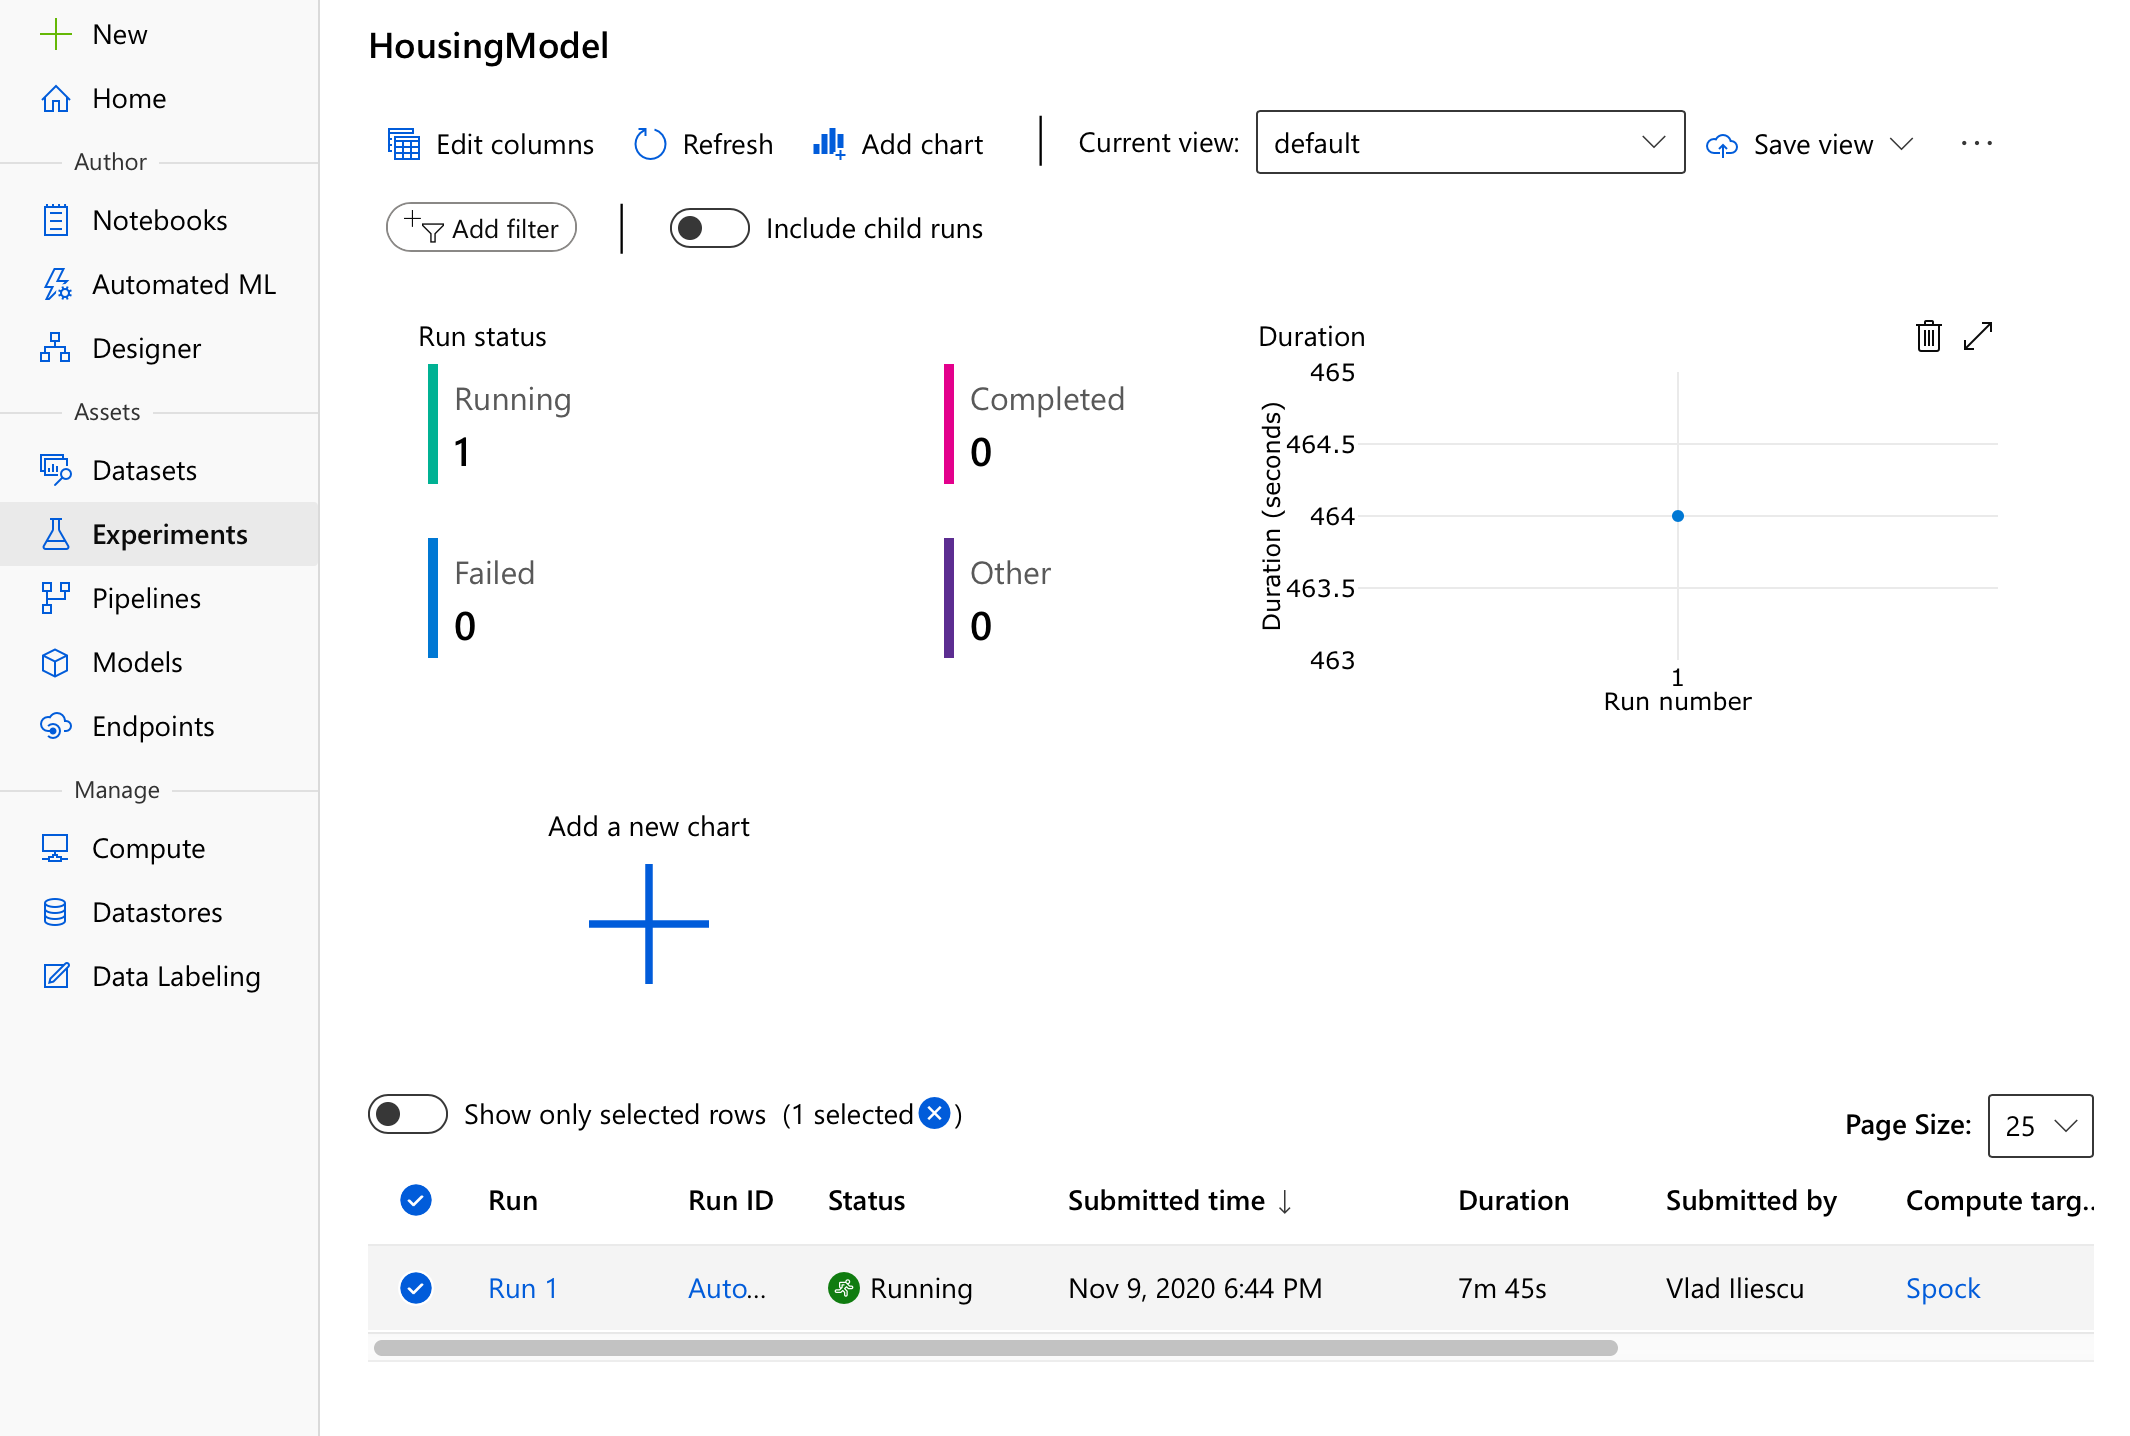
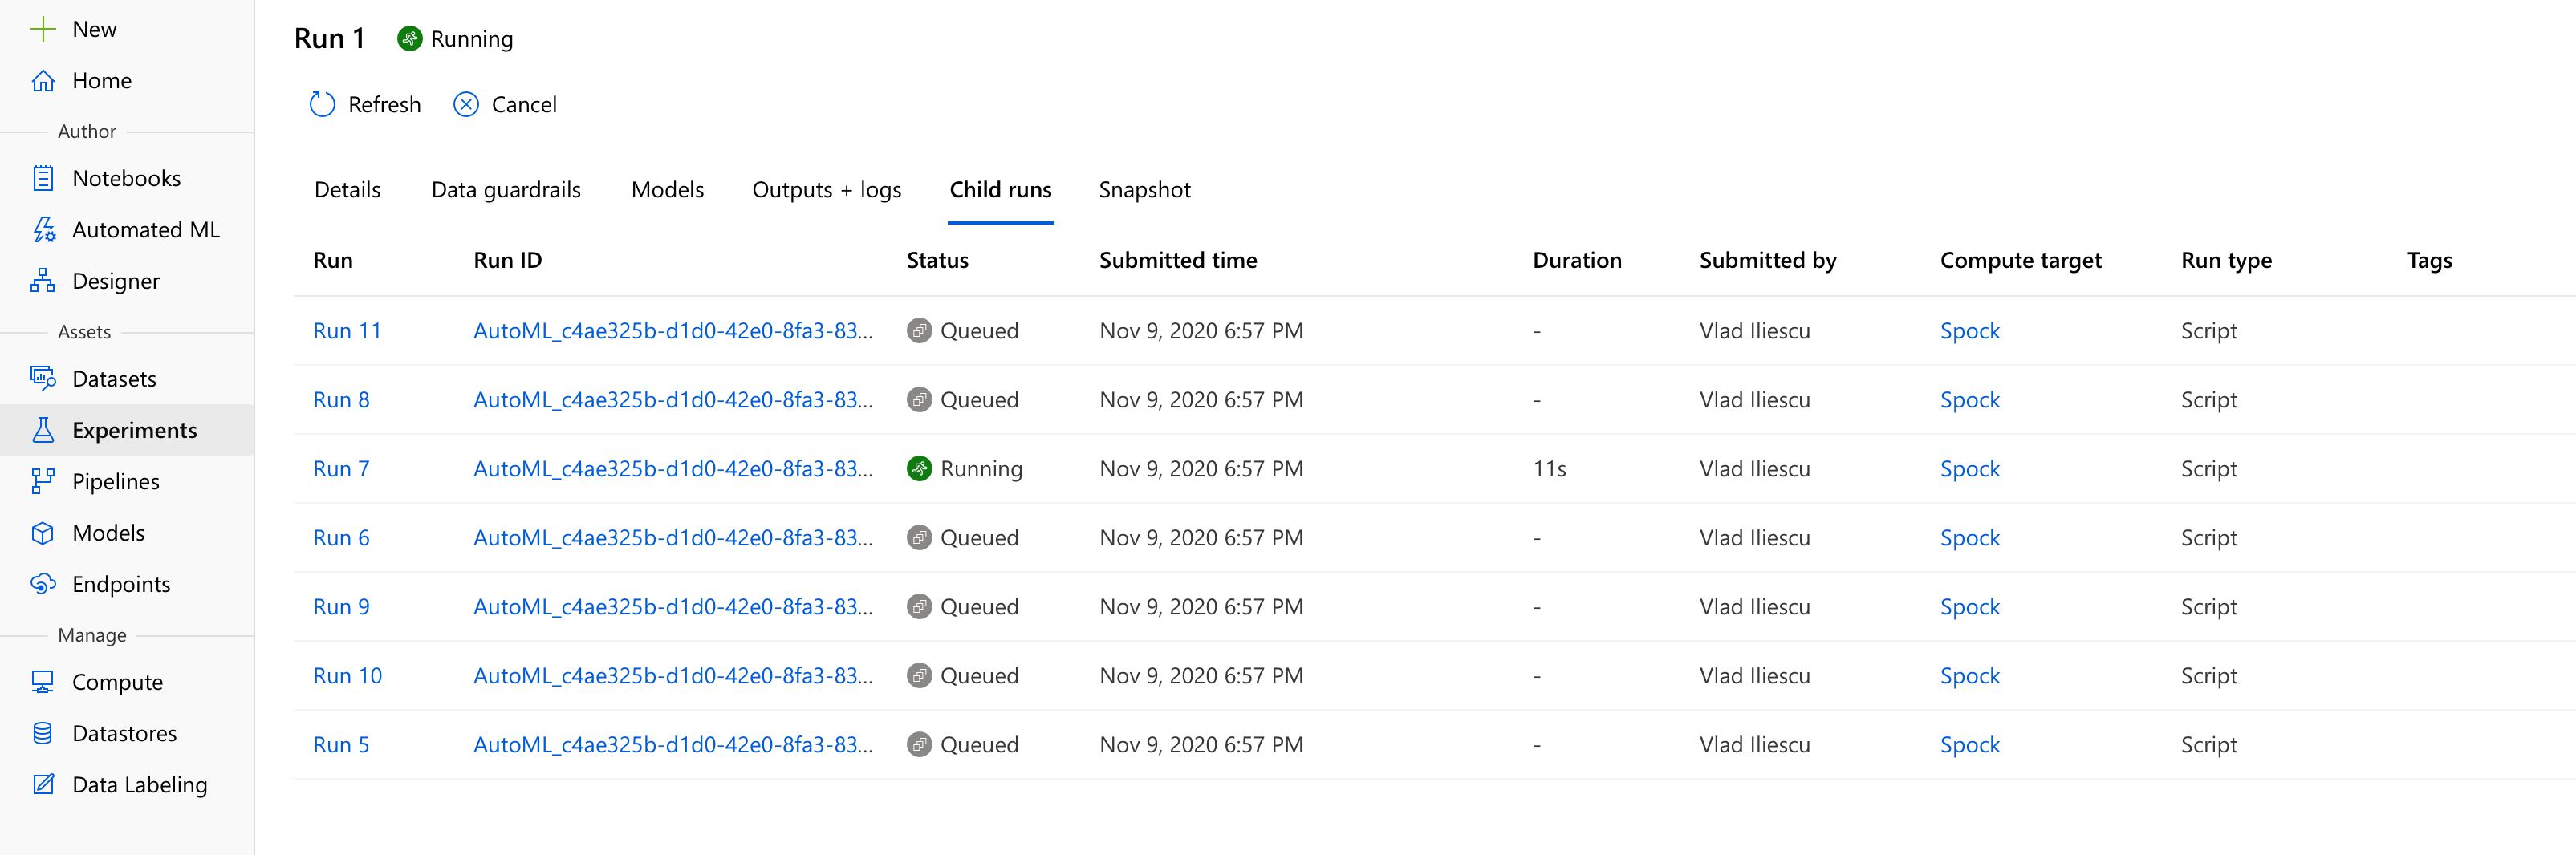
Once started, you’ll notice a new experiment has been created which has a run, well, running. This run, lovingly called Run 1, contains all there is to know about our automl run - most importantly any and all data issues it detected and their fixes in the Data guardrails tab, and also a growing list of potential models currently evaluated in the Child runs tab.
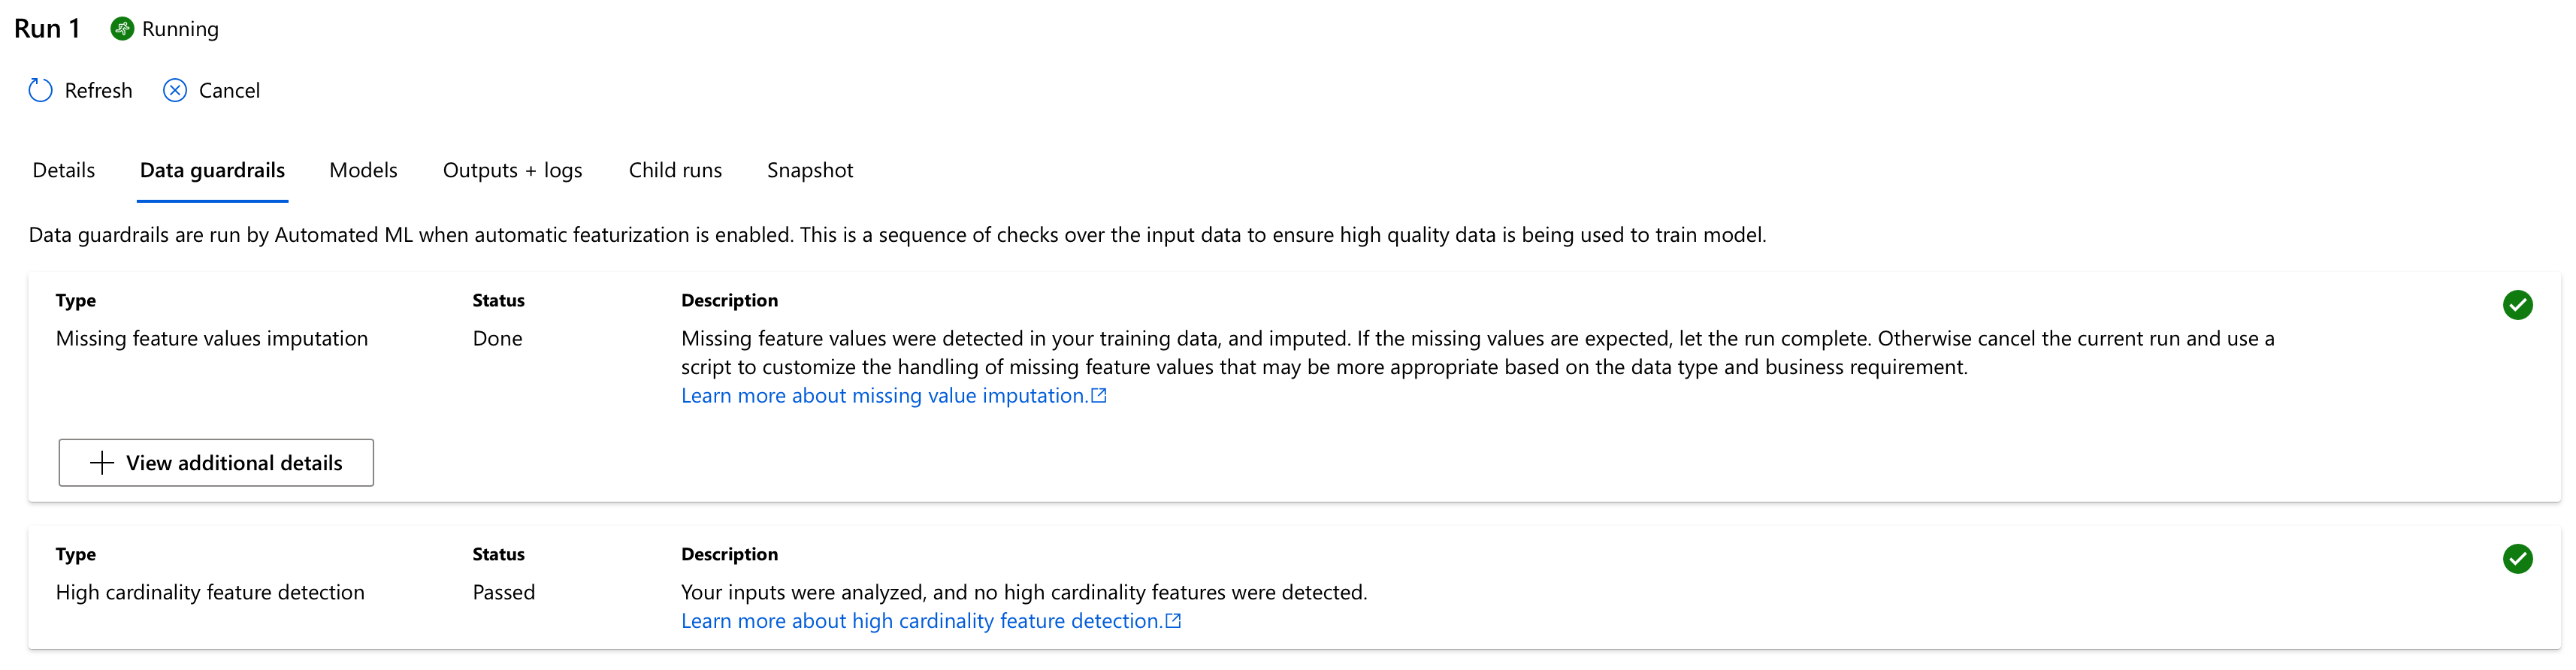
You’ll notice a bit of a delay when you first start an AutoML run — this is because of mainly two reasons:
- On the one hand, before it starts, Azure ML needs to configure a Docker image with all the Python packages needed to run. This takes a few minutes, but it ensures further reproducibility (plus, it’s really cool)
- On the other hand, our compute nodes each need to be allocated and then they need to pull those automl-enabled Docker images created earlier, taking a few minutes more — you can check the status of the compute allocation at any time in the
Computemenu, but I suggest brewing a coffee instead and only take a look afterwards to make sure there’s something to see.
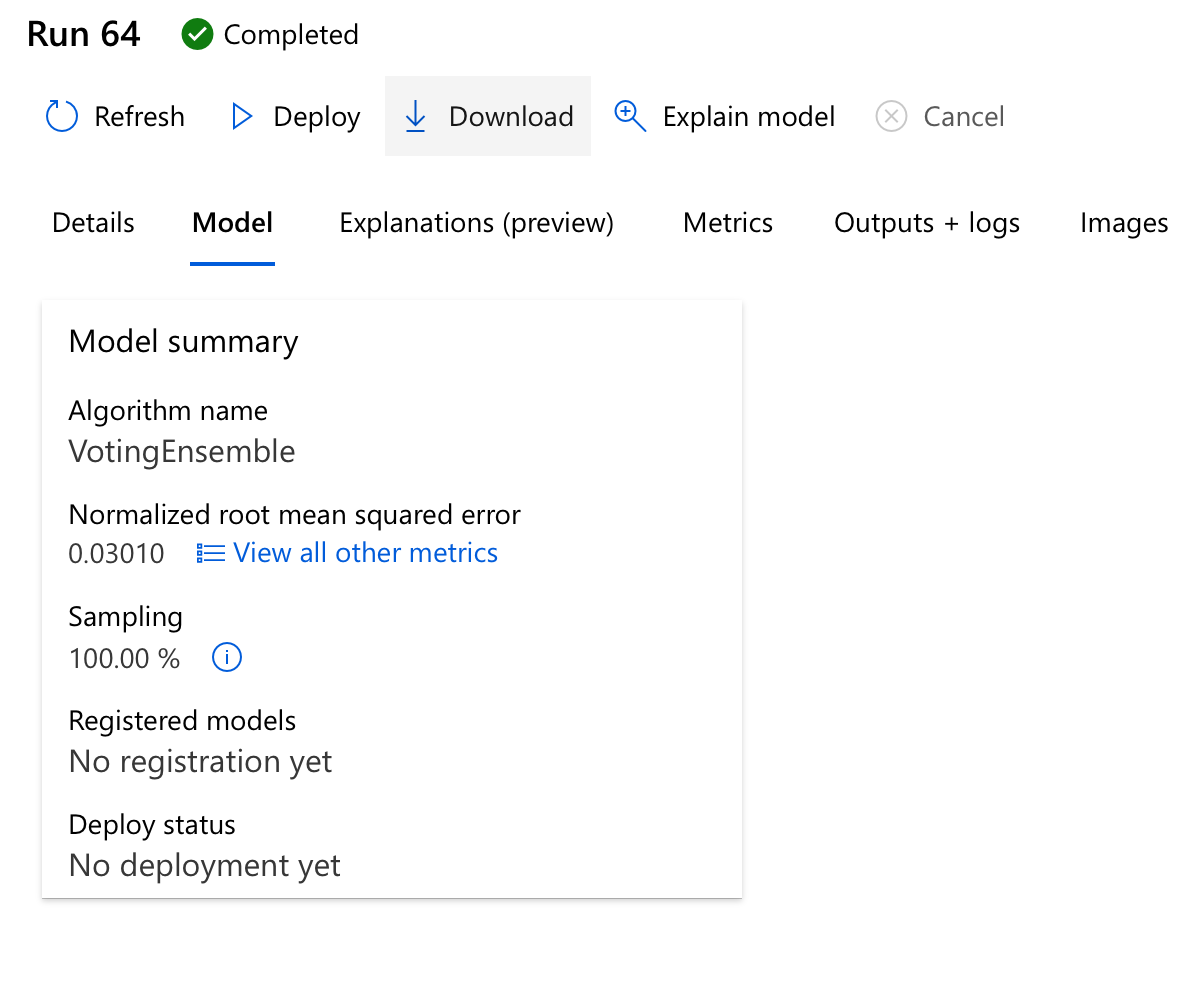
After what I can only hope were no more than three espressos and a latte, we’ll start seeing some interesting results. For my setup, in less than 40 minutes Auto ML explored 65 possible models, including stacked and voting ensembles of the best performing models, and identified a Voting Ensemble as being the best of the best.
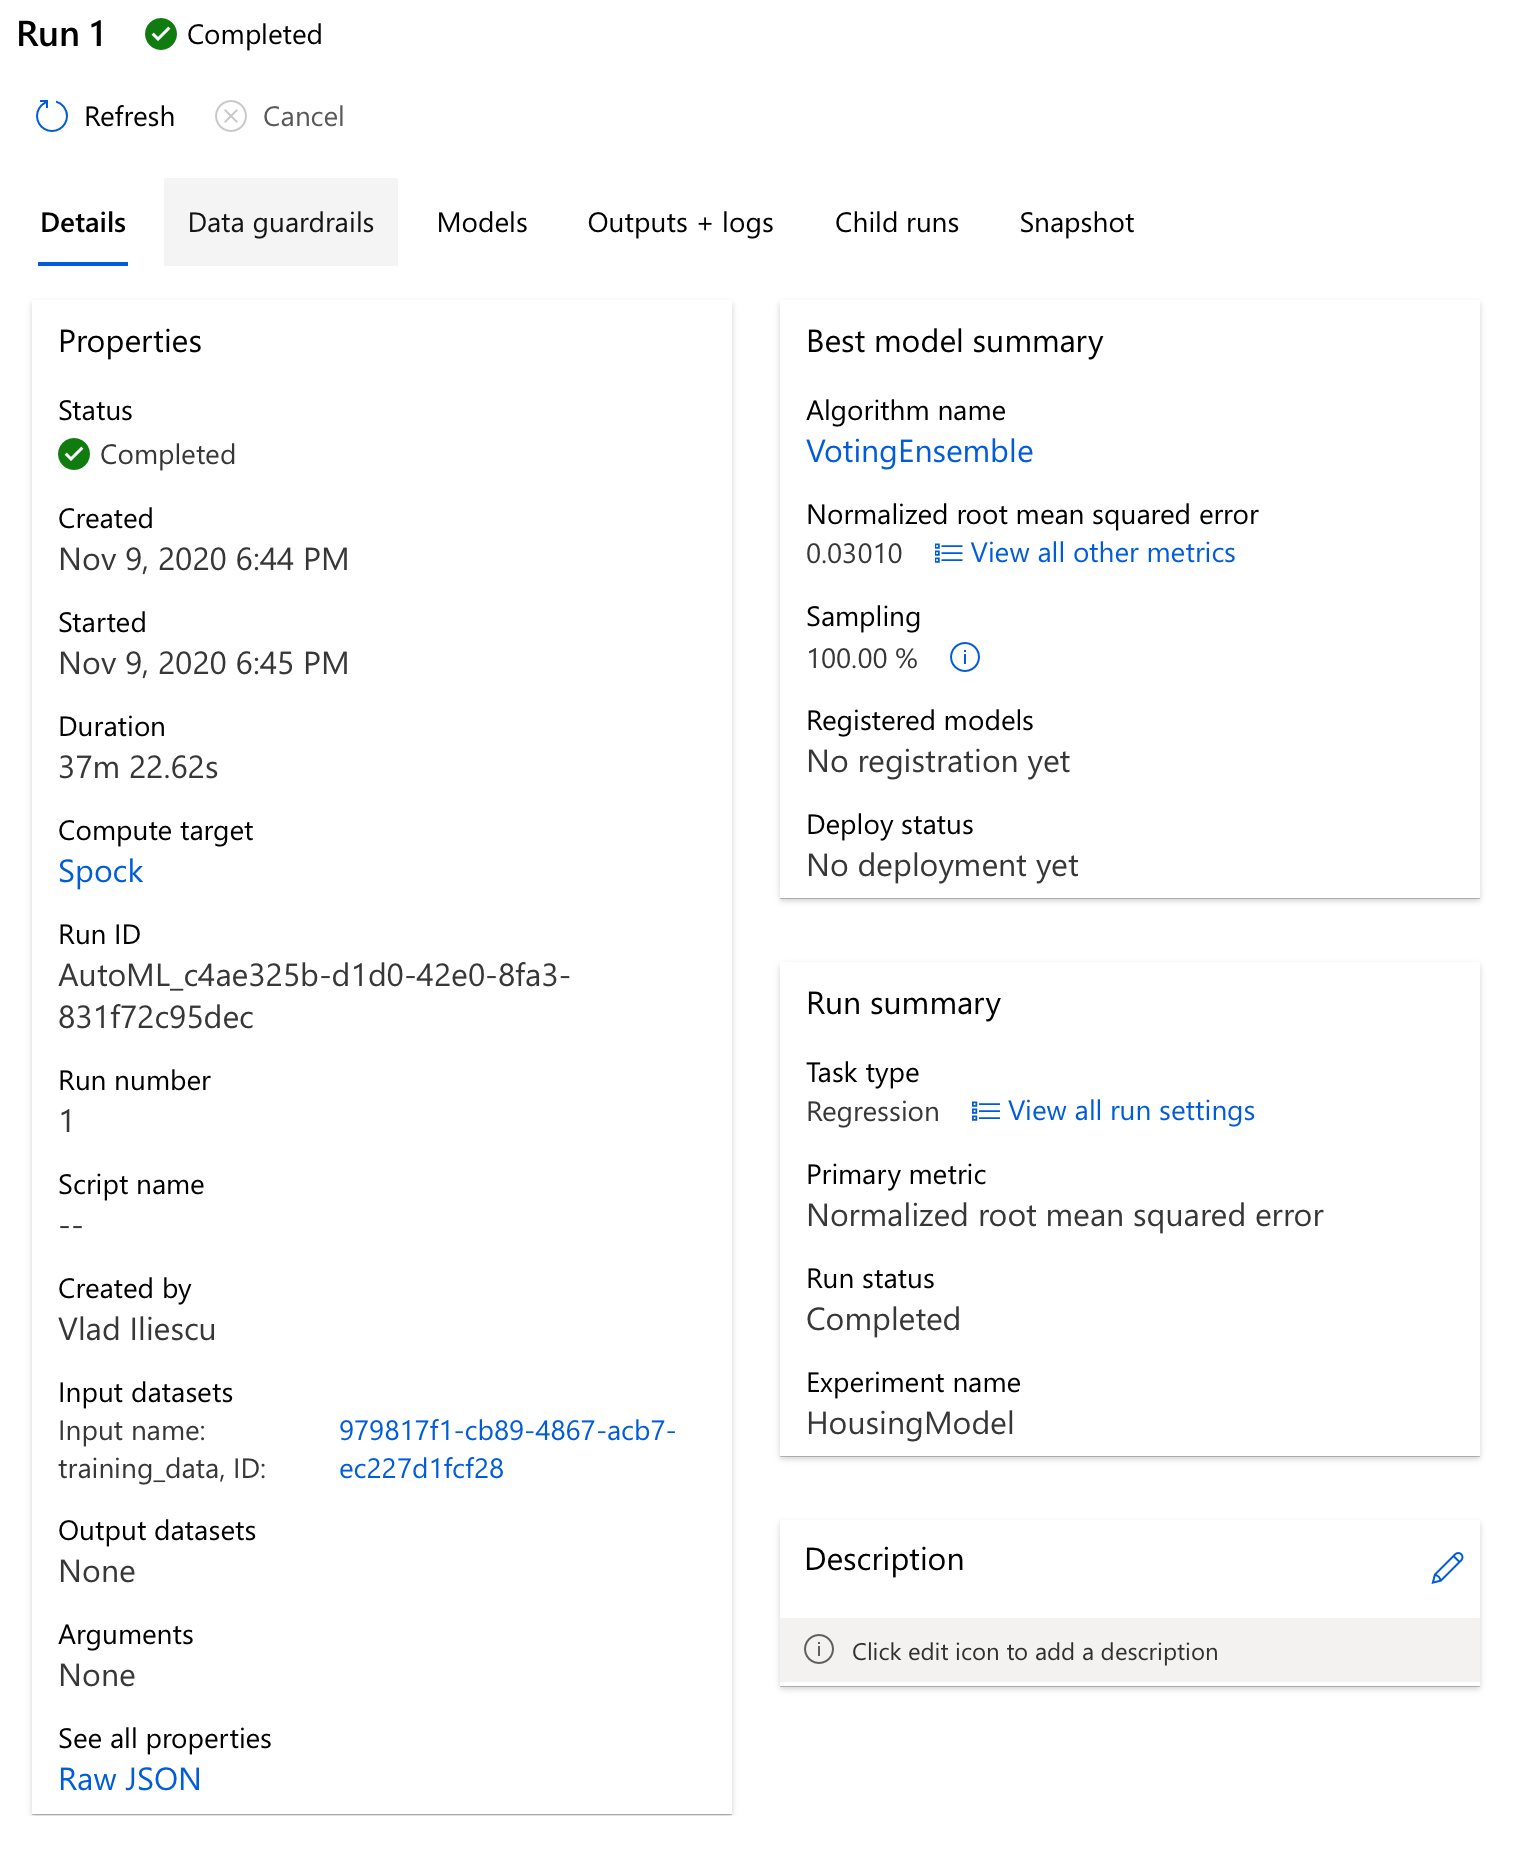
You can take a look at its details of course, there’s a lot of interesting stuff here including but not limited to the generated explanations and metrics - you’ll notice Auto ML calculated a lot of metrics apart from our primary one - Normalized root mean squared error. These include Explained variance, Mean absolute error, R2 score, Spearman correlation, even Root mean squared error. The special thing about the primary metric is that it’s used to identify the best model - had you chosen a different metric, you may have gotten a different model.
Once you decide which model to use, there’s also a simple way for you to Deploy your model directly in Azure ML, or even Download it and deploy it to the cloud of your liking.
Congratulations, you’ve done it!
If you’ve followed along this guide, then it means you’ve done quite a few things: you’ve defined a problem, found meaningful data that can be used to solve said problem, configured the necessary Azure resources that enabled you to automatically train a model on the data.
Profit?
Now you’re probably wondering how to make use of this model, be it for further evaluation and improvement or for deploying it as a REST endpoint and integrating it in your AI-powered, blockchain-enabled startup.
In other words, how do we profit from this?
- 🗄
Get the Data - 💻
Find a computer - 🤖
Run Automated ML - 💰 Profit?
That my friends, is a story for another time. Update: I’ve posted this article that goes into the nitty-gritty details of deploying models with Azure ML Pipelines.
Thanks for reading, I hope you’ve enjoyed this article. If you did, I’d appreciate it if you shared the Twitter thread:
Machine learning is hard, but it's getting more and more accessible each day.#AutoML is just one of the many ways ML can be made less intimidating for beginners, read my guide on getting started with Automated #MachineLearning in #Azure for an example. https://t.co/LRbNKz9seG
— Vlad Iliescu (@vladiliescu) November 15, 2020
I regularly publish new articles about using Azure Machine Learning in real-life, join my email list and be among the first who learn from them. See you! 👋