Ever since my article on running Stable Diffusion on Azure ML, I’ve been thinking about how to make the experience of using compute instances more enjoyable. Now that I’ve been using them for a while, I’ve learned a few things that have made my life a little better, so I thought I’d share them with you.
So without further ado, here are my top 3 tips for working better, faster, and just a bit stronger with Azure ML Compute Instances:
1. Use VS Code to manage your compute instance
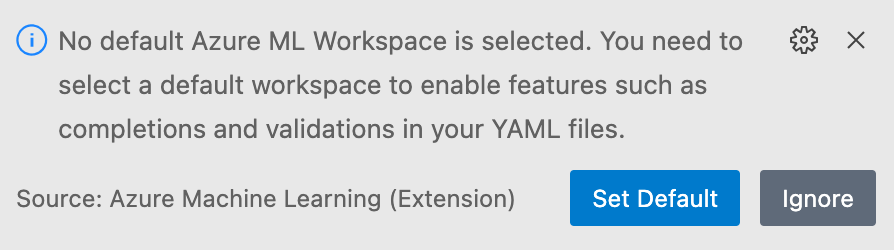
To be honest, I have a love-hate relationship with VS Code’s AML extension. On the one hand, I hate the way it pops up every time I do something useful (like editing a .py file) and asks me to set up a default workspace. Dismissing it only makes it stronger, and it will keep popping up after every restart, relentlessly distracting, until you set a default workspace. Which of course fails when you switch tenants/users, because who does that anyway? I’ve actually taken the time to open a GitHub Issue for this behavior, so hopefully it’ll be fixed soon.
You might think that only chance is to disable the thing and never use it again.
Until you do use it again, of course. I swear, this is what Dua Lipa’s New Rules was all about - disabling and enabling the AML extension in a never-ending loop.
So, what do you use it for? Well, it’s very nice for managing your compute instances. Specifically, its ability to connect to compute instances and pretend you’re on your local machine is quite something. You get access to the file browser, you can run commands in the embedded terminal, you can install extensions, you can git clone, pull, squash, ping-pong, whatever. It’s become the main way I interact with my compute instances, and I urge you to try it out, at least once. You’ll thank me later.
Apart from this you can also manage said compute instances, but for this I prefer to just use az ml cli – az ml compute start -n "${compute}" -w "${ml_workspace}" -g "${resource_group}" is just faster than using a GUI.
Connecting to a compute instance is as simple as clicking the VS Code link for that compute instance. Once you’ve done that once, you can just Open Recent in VS Code – it’s faster than having to open AML Studio and looking for the compute.

2. All computes in a workspace share the same storage
Let me ask you a question: do you know where your compute instance stores its files? I for one didn’t, but then I had a VM crash on me and had to find that out the hard way 😬. The docs definitely help – you have two types of storage: the OS disk, which you mostly shouldn’t use because it only has 120 GB, and the ~/cloudfiles/code directory, which points to the same storage account that’s created along with the AML workspace.
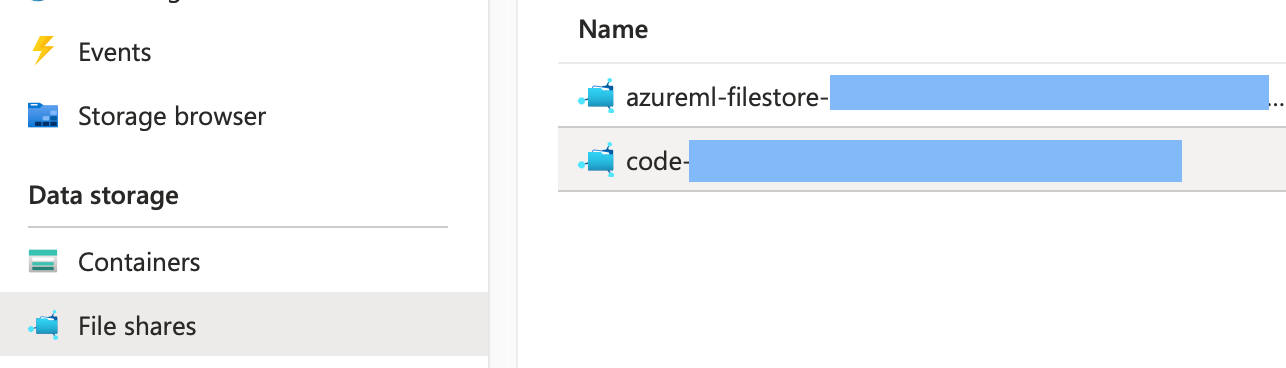
By the way, you might think that the files would be stored in one of the Containers, just like the other AML resources. However, that’s not the case – they’re actually stored in a File share, just take a look at the list there and browse the one that starts with code-.
There you’ll find all the files you had created in your ~/cloudfiles/code directory, and you can manage those using the Azure Storage Explorer.
Also, when you create a new compute instance, it will automatically mount that storage to the same ~/cloudfiles/code path. Which means you can work on the same files from multiple computes, and you never have to worry about keeping them in sync. The next tip will help you with that too 😉.
3. There’s never enough storage for conda envs

True, indeed. Especially considering your VM only has something like 120 GB of storage for the operating system, which..you know…in this day and age fills up pretty quickly anyways, not to mention when pip installing this and pip installing that. To give you an example, here’s the conda envs for a VM of mine, that I’ve been using to run Stable Diffusion Web UI, and trying to run FLAN-UL2.
(base) azureuser@puter:~/cloudfiles/code$ conda env list
# conda environments:
#
base                  *  /anaconda
a1111-sdwebui            /anaconda/envs/a1111-sdwebui
azureml_py310_sdkv2      /anaconda/envs/azureml_py310_sdkv2
azureml_py38             /anaconda/envs/azureml_py38
azureml_py38_PT_TF       /anaconda/envs/azureml_py38_PT_TF
flan2                    /anaconda/envs/flan2
(base) azureuser@puter:~/cloudfiles/code$ df -h
Filesystem                                                Size  Used Avail Use% Mounted on
/dev/root                                                 119G  112G  6.9G  95% /
# ...
//<workspace-storage>.file.core.windows.net/<file-share>  5.0T   29G  5.0T   1% /mnt/batch/tasks/shared/LS_root/mounts/clusters/puter/code
As you can see, thanks to all the PyTorch dependencies, plus the three AML default conda envs (azureml_py310_sdkv2, azureml_py38, and azureml_py38_PT_TF), I’m already at 95% usage 🥶 on my system disk.
If it gets full, then bad things will happen, and you’ll have to start deleting stuff from the terminal. If by any chance you delete one of the default conda envs then GAME OVER, you need to recreate the VM - the docs tell you that deleting them will only cause Jupyter & JupyterLab to stop working. In my experience…deleting them pretty much bricked the machine - I wasn’t able to connect using Terminal, nor VS Code, not to mention Jupyter & JupyterLab. A harrowing experience, to say the least.
So..what do you do if you don’t want to to go through that?
One thing I’ve found to work is to create conda envs directly on the mounted storage using conda create --prefix, which may either sound like a stupid or brilliant idea, depending on who you ask.
That’s because on the one hand, it’s slow as a snail (everything goes through the network 🥶), on the other hand hey, free storage 🎉! Pretty much like a swap file, but for conda.
Now, in my tests, creating the environment will be slow-slow, same as with pip installing. Once you’ve done that however, at least for Stable Diffusion UI installs, things run pretty smoothly. Not sure about other workloads, I strongly assume that loading the packages into memory will be slower than if they were on the system disk, but I’m not sure of the actual performance impact.
Long story short, I see this as a good alternative to having to recreate all conda envs every time you need to create a new compute instance – just create them on shared storage, take the performance hit once, and then you’re good to go.
Here’s how you can do it if you want to try:
cd ~/cloudfiles/code/Users/<user>

# Create a new conda env, relative to the current directory
conda create --prefix ./conda-envs/hello-world python=3.10

# Activate the new conda env, remember the path is relative to the current directory
conda activate conda-envs/hello-world/

# Now you can just pip install whatever
pip install scikit-learn
You’ll need to pay attention to the environment path, since it will differ depending on what directory you’re in. There’s a fix for this however, which is to add the directory to conda’s envs_dirs setting. All you need to do is run the following command:
conda config --append envs_dirs ~/cloudfiles/code/Users/<user>/conda-envs

# Then, you can just
conda activate hello-world
That’s it for now, I hope you found this useful. If you have any questions, feel free to reach out to me on Mastodon or LinkedIn.