
About
Ever since I had read Andy Salerno’s post on How to Draw Anything I was fascinated by the idea of using Stable Diffusion to, well, draw anything. Architecture and concept design, people from all over the world, even ultra-wide bathroom layouts.
Alas, I cannot. You see, I use a Mac. And not one of those fancy, new M-series Macs. Oh no. I use a 2016 MacBook Pro baby, Intel chip, terrible butterfly keyboard and all.
But I digress. Bottom line is, I can’t run Stable Diffusion locally, and I’m not a fan of spending credits for each and every image generation (looking at you DreamStudio!). Oh, and I have an Azure subscription, just waiting to be used.

So, you know 🤷🏻♂️. I did what any reasonable person would do. I went ahead and created a compute instance on Azure ML, installed Stable Diffusion, and ran AUTOMATIC1111’s Web UI. And it worked, almost as well as I had hoped - so naturally, I wanted to share it with you.
Here’s how I did it.
Prerequisites
Before we start, let’s make sure you have the right tools available on your machine - to save a lot of clicking through the Azure portal, you’ll need the Azure CLI (install instructions here), and its ML extension (install instructions here).
Once you’ve installed the CLI, it’s time to log into Azure and make sure the subscription you want to work with is set as default.
# Log in with your Azure account
az login

# Check existing accounts, look for the subscription you want to use
# (useful if you have access to several subscriptions)
az account list --output table

# Set your active subscription
az account set --subscription "<your-subscription-id>"

# Check the accounts list again, make sure that your subscription is active
# (IsDefault should be true)
az account list --output table
Creating the Azure Resources
Now, that that’s out the way, let’s create a few resources:
- A new resource group
- An Azure ML workspace
- A GPU compute instance
The Resource Group
First, let’s pick some good names (or just go with my suggestions for everything except the compute name), plus your favorite and/or closest Azure location e.g. westeurope or eastus.
NOTE: I’m using bash syntax in the snippets below, so if you’re on Windows you’ll need to make a few changes:
- Define variables using
SET, e.g.SET compute="rintintin" - Reference variables using
%variable_name%instead of${variable_name}, e.g.az group create --name "%resource_group%" --location "%location%"
compute="rintintin"
ml_workspace="ml-stable-diffusion"
resource_group="rg-stable-diffusion"
location="eastus"
Then, create the resource group that will, well, group our Azure resources.
az group create --name "${resource_group}" --location "${location}"
The Workspace
Now, let’s create an ML workspace - you’ll need this to do anything ML-related in Azure. It needs a good name again, and a reference to the resource group you’ve just created.
# Create an ML workspace
az ml workspace create -n "${ml_workspace}" -g "${resource_group}"
Requesting Access to GPU Compute Instances (optional if you’re lucky)
This is where things might get a bit hairy, but not for the reasons you expect. Since I’m strongly assuming you want to run Stable Diffusion on a GPU, then the first thing you need to do is make sure you have enough GPU quota. You can check this by going to ml.azure.com/quota and looking for how many GPU cores you have available - the available machine types and their respective costs are here, with some more details here.
Personally, I’ve tested Stable Diffusion on a Standard_NC6 (1xTesla K80, 1.17$/hr), Standard_NV6 (1xTesla M60, 1.36$/hr), and Standard_NC6s_v3, the fairest of them all (1xTesla V100, 3.82$/hr). The first two sludged at around 1.3 iterations per second when running checkpoint 1.5, while the V100 ran at 9.5-10.5 it/s, reaching around 12.5 it/s with Meta’s xFormers enabled. If you can get your hands on a V100, I strongly recommend it. 🚀
Anyways, if you don’t have enough cores available you can request more by clicking the “Request Quota” button. You’ll need to provide some information about your subscription/quota type, and then wait for the request to be approved. One thing to note is the difference between the names of the VMs in the Azure portal, and in the Azure ML portal - you’ll request one thing and get another, for example requesting NCSv3 allows you to use the Standard_NC6s_v3 compute type. The GPU sizes page is your friend on this one but it’s on the frustrating side of things to be honest, hopefully the team will prioritize fixing these discrepancies in the near term.
It’s also possible that the request will be denied, most likely due to GPU instances not being available for your specific location. In case this happens, my best advice here is to try again with a different location (eastus is a pretty solid choice here), or GPU instance. And, just so you know, I’ve had requests for older machines such as NCSv2 rejected due to them being phased out, and requests for the newer NCSv3 rejected due to them not being available for subscriptions with included credits, so ymmv.
Once you have enough quota you can create a compute instance, which we’ll then use to run the Stable Diffusion Web UI.
The Compute Instance
First, create a compute.yaml file describing the compute instance:
$schema: https://azuremlschemas.azureedge.net/latest/computeInstance.schema.json

type: computeinstance

size: Standard_NC6s_v3
idle_time_before_shutdown: "PT30M"

schedules:
   compute_start_stop:
      - action: stop
        trigger:
         type: cron
         start_time: "2023-01-01T21:21:07"
         time_zone: UTC
         expression: 0 23 * * *
It will create a compute instance of type Standard_NC6s_v3, and shut it down after it’s idle for 30 minutes and also each day at 23:00 UTC+0 (you can never be too careful 🤕). You can, of course, change the size to any other GPU instance. If you’re not sure what GPU instances you have access to, just run az ml compute list-sizes -l <location_eg_westus> --output table and look for instances with GPU in the GPU column.
Run the next command to create the compute instance, and update the names if needed:
az ml compute create -f compute.yml -n "${compute}" -w "${ml_workspace}" -g "${resource_group}"
This will take a few minutes, so go grab a coffee or something. Once it’s done, you can check the status of the compute instance by running:
az ml compute show -n "${compute}" -w "${ml_workspace}" -g "${resource_group}"
You can also see the instance in Azure Machine Learning Studio, by going to the Workspaces tab, selecting the workspace you’ve just created, then visiting the Compute tab and looking for your compute instance.
Make sure it’s running, then click its Terminal link to start a new terminal session. It’s time to set up the Stable Diffusion Web UI.
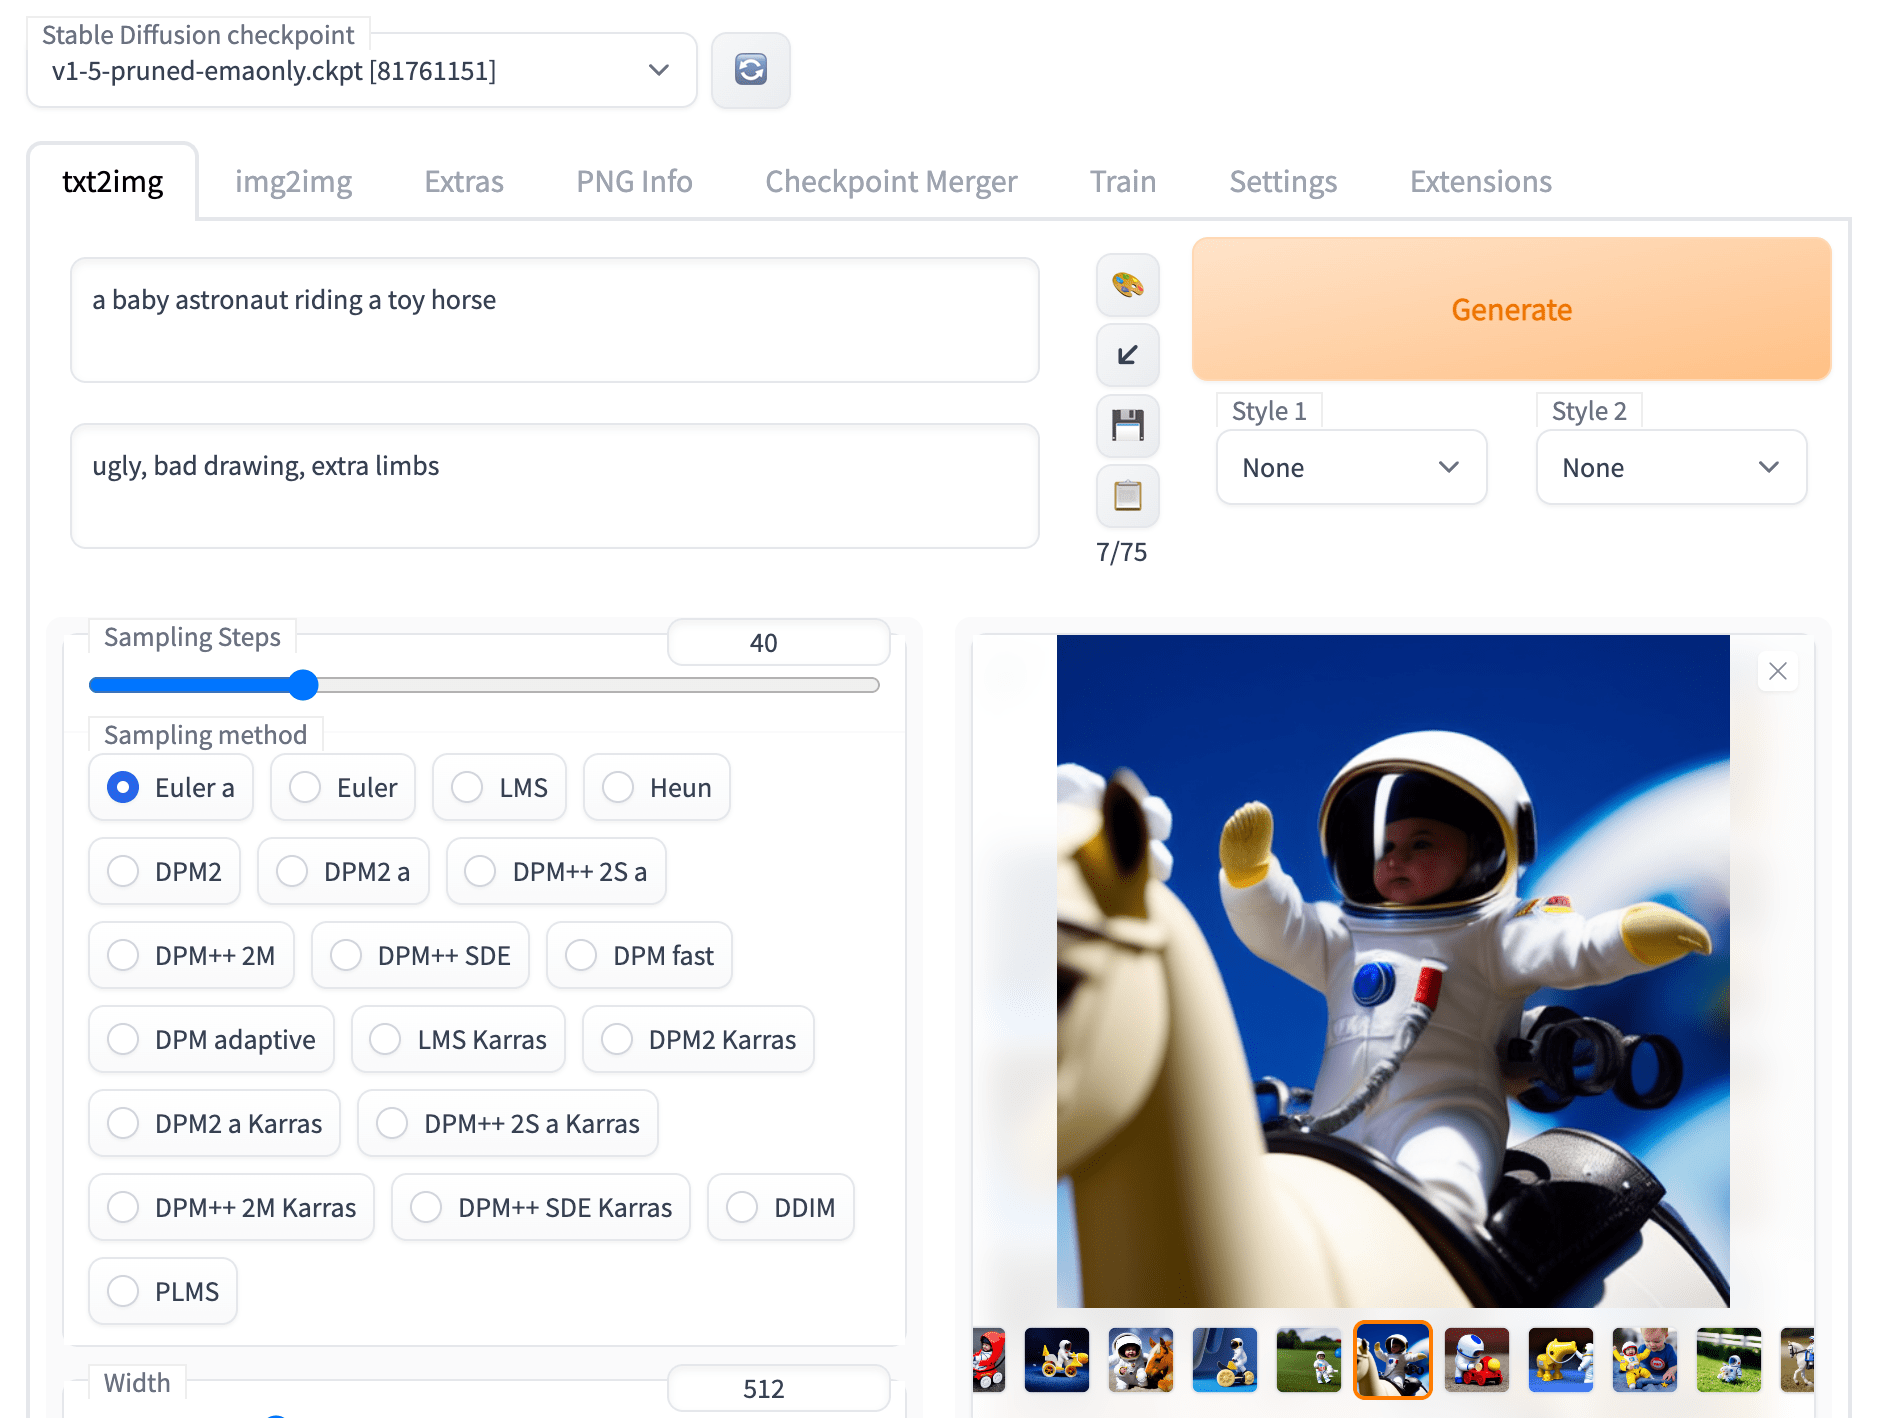
AUTOMATIC1111’s Stable Diffusion Web UI Setup
First, let’s clone the AUTOMATIC1111/stable-diffusion-webui repo and install its dependencies. Remember, all of this is happening on the compute instance, nothing’s running on your local machine.
# Clone the SD WebUI
git clone https://github.com/AUTOMATIC1111/stable-diffusion-webui.git

# Go to the models folder
cd stable-diffusion-webui/models/Stable-diffusion/
To be able to download the models, you’ll need to provide a HuggingFace auth token, which you can create here. Then, it’s just a matter of downloading the models - let’s go with RunwayML’s 1.5 checkpoint for now, and later on I’ll show you how to install Stable Diffusion 2.1 as well.
# Download Stable Diffusion 1.5 checkpoint (requires a HuggingFace auth token)
curl -H "Authorization: Bearer <your-huggingface-token>" https://huggingface.co/runwayml/stable-diffusion-v1-5/resolve/main/v1-5-pruned-emaonly.ckpt --location --output v1-5-pruned-emaonly.ckpt
Now, let’s install the web ui’s dependencies - Azure ML compute instances come with Conda pre-installed, so in order to keep things nice and clean we’ll use it to create a new environment.
# Create a new Conda env with the desired Python version
conda create -n a1111-sdwebui python=3.10 -y

# Activate the new env
conda activate a1111-sdwebui

# Go back to the root of the repo..
cd ../..

# ..so we can install the repository's dependencies..
pip install -r requirements_versions.txt

# ..which for some reason won't install everything leading to the web ui crashing
# while complaining about `undefined symbol: cublasLtGetStatusString, version libcublasLt.so.11`
# So, we need to install the missing dependencies directly from conda
conda install pytorch=1.13 torchvision=0.14 torchaudio=0.13 pytorch-cuda=11.7 -c pytorch -c nvidia -y


# If you want/need an older version, see the alternatives here https://pytorch.org/get-started/previous-versions/
# e.g. I've had success with
# conda install pytorch==1.12.1 torchvision==0.13.1 torchaudio==0.12.1 cudatoolkit=11.3 -c pytorch -y

# Mark everything as a safe directory,
# we need this because when first run,
# the web ui will try to clone some repos under this directory,
# and we'll get a lot of dubious ownership errors,
# which we don't really want to be honest
git config --global --add safe.directory '*'
And that’s pretty much it! 🎉

I’ll show you a couple of improvements in a moment, but for now rejoice, and start the Web UI by running the command below (p.s. it will take a while until it downloads all its extra dependencies, so be patient 😉):
# Don't forget to pick a good userame/password combo, otherwise anyone will be able to access your instance
accelerate launch --mixed_precision=bf16 --num_cpu_threads_per_process=6 launch.py --share --gradio-auth <user>:<pass>
⚠️ Note that you can only use bf16 (bfloat16) for mixed_precision if you have a beefy enough GPU (read: A100), otherwise you’ll need to set this to fp16, as detailed in this Reddit comment.
TL;DR: if you have the right hardware, use BF16 :-)
Both consume the exact same memory as they encode each number on 16 bits. On recent Nvidia GPU (Ampere generation like A100 and 3090 RTX), tensor cores boost both of them. On older ones (like a V100 or a T4), bfloat16 is not supported so life is easier because you have no choice.
Once it finishes downloading the dependencies and loading the model, look for the following line in the logging output Running on public URL: https://<some-random-hash>.gradio.app. This is the URL you’ll use to access the Web UI (pay attention when sharing it, of course).
And what’s --gradio-auth <user>:<pass> bit? Well, it’s a way to protect your instance from unwanted visitors. It’s not the most secure way to do it, but it’s better than nothing, otherwise you risk having people randomly finding your instance and using it to generate all kinds of fun stuff.
And, please make sure to pick a stronger user/pass combo than marco:polo.

Installing Stable Diffusion 2
We’ll follow the instructions from the webui repo:
# Go to the models folder
cd stable-diffusion-webui/models/Stable-diffusion/

# Download the x768 model, specifically the safetensors versions for increased security and loading speed
curl -H "Authorization: Bearer <your-huggingface-token>" https://huggingface.co/stabilityai/stable-diffusion-2-1/resolve/main/v2-1_768-ema-pruned.safetensors --location --output v2-1_768-ema-pruned.safetensors

# and its config as well
curl https://raw.githubusercontent.com/Stability-AI/stablediffusion/main/configs/stable-diffusion/v2-inference-v.yaml --output v2-1_768-ema-pruned.yaml
Now, you can run the web ui again, and select the v2-1_768-ema-pruned.safetensors model from the dropdown menu - enjoy!
Running Faster
Remember how I said that you can get about 9-10 iterations per second on a Standard_NC6s_v3 instance? Well, that’s not the best we can do: we can actually get about 12.5 it/s by installing and enabling Meta’s xFormers library.
And the catch? On the one hand, these will not work at all on older GPUs such as Standard_NC6 and Standard_NV6 (I mean it - after installing the library on those machines, I kept on receiving errors about needing compute power > 50 whenever I tried to generate an image, and I hadn’t even enabled them in the web ui; only way I could get the ui to work again was to conda uninstall the thing).
On the other hand, things might get a bit non-deterministic, some people seem to be complaining about getting inconsistent generations with the same seeds/settings. I’ve personally had no issues with this, but then again, I wasn’t really paying attention to it. 🤷🏻♂️
Here’s how you can try them out, and possibly get a 20% speed increase at the cost of some determinism here and there:
# Install xFormers
conda install xformers -c xformers/label/dev -y

# Enable them in the Web UI
accelerate launch --mixed_precision=bf16 --num_cpu_threads_per_process=6 launch.py --share --xformers  --gradio-auth <user>:<pass>
Installing Extensions
At some point you’re probably going to want to install some extensions, and you’ll be hit by a very friendly, but firm error message: AssertionError: extension access disabled because of command line flags. What’s happening is that, since you’re not running on localhost and everyone in the whole wide world can in theory access your Web UI, you need to explicitly enable extensions.
You can do it by adding the --enable-insecure-extension-access flag to the accelerate launch command as follows. Note that you can simply enable it while installing the extensions, and then disable it after you’re done.
accelerate launch --mixed_precision=bf16 --num_cpu_threads_per_process=6 launch.py --share --xformers --enable-insecure-extension-access --gradio-auth <user>:<pass>
Running the Web UI again in the future
Next time you want to generate something, just start the machine from the Azure ML portal, jump to the Terminal, conda activate a1111-sdwebui and run your favorite accelerate launch command again.
Conclusion
Congratulations 🥳! You now have a fully functional Stable Diffusion Web UI running on an Azure ML GPU compute instance, and you can use it to generate all kinds of images, or even train your own models.
Just remember to stop your machine whenever you’re not using it 😉.
P.S.
If you want a better Azure ML Compute experience, you might be interested in this post:
Want to be notified whenever I post something but don’t want to mess around with RSS? Join my newsletter 🗞, it has cookies (the good kind).
Last but not least, feel free to reach out to me on Twitter or join the thread here:
Just posted a guide on using AUTOMATIC1111's Stable Diffusion web UI on Azure ML GPU compute instances.
— Vlad Iliescu (@vladiliescu) December 4, 2022
It includes:
1️⃣ Setting up AML GPU instances using the CLI
2️⃣ Installing the web ui and checkpoints 1.5 and 2.0
3️⃣ Speed increases with xFormers
andhttps://t.co/VfYN7WGCED
Cheers!
Changelog
2023-01-29- Use variables when creating the Azure resources
- Schedule the compute instance to stop each day at 23:00 UTC
2023-01-02- Replaced
--force-enable-xformerswith the improved--xformerslaunch option - Added instructions for downloading the safetensors version of Stable Diffusion 2.1
- More info about the difference between
fp16andbf16formixed_precision
- Replaced
2022-12-04- Everything