
One of my favorite ways to deploy machine learning models in production is by using Azure Machine Learning, especially their new managed online endpoints feature. I’ve been working with these ever since v2 was in preview, and in the meantime I’ve become quite a fan.
Having previously worked with Azure Container Instances, I was initially skeptical about using these online endpoints over ACIs (why change a good thing that works? do they bring enough improvements to warrant the learning curve?), but I’ve come to appreciate them for a few reasons:
-
🔐 Built-in Security - as opposed to ACI, managed online endpoints are secured by default using Bearer tokens. If you prefer the extra peace of mind coming from token expiration dates, then you can use AML access tokens instead.
-
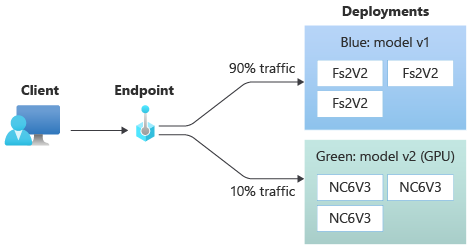
🔵 Native Blue/Green Deployments - I ❤️ these! You’re free to create as many deployments as you want for a single endpoint and assign different traffic percentages to each one. You can even mirror a percentage of the traffic to another deployment and collect performance metrics for comparison, effectively enabling shadow models.
-
🚀 Auto-Scaling with Azure Monitor - abnormal traffic spikes is a thing I wish to all my friends running SaaS apps 😛. With Azure Monitor you can set up scaling rules and never worry about your dad-jokes as a service app failing to deliver timely humor.
Coming from Azure Container Instances however, it was a bit of a challenge to deploy my first model. Truth be told, this was mainly due to me not paying a lot of attention when reading the docs and simply assuming that the deployment process would be similar to ACI, but it still led me to write this quickstart guide aggregating all the information I found scattered around the web. Hopefully it’ll help you get started with managed online endpoints as well.
Here we go.
Prerequisites
I’ll assume you’ve already trained a model and are looking to deploy it. If you don’t have one just lying around the house and waiting for you to notice it then don’t you worry, I’ll show you how to get around that.
Apart from the model, you’ll also need the following tools installed:
- Azure CLI, look for your platform’s install instructions here
- Azure ML CLI v2, with the install instructions here
For example, on MacOS the installation process is as simple as running the following commands:
# Azure CLI
brew update && brew install azure-cli

# And the Azure ML extension
az extension add -n ml
Then make sure you’re logged into azure, and the right subscription is active.
# Log in with your Azure account
az login

# Check existing accounts, look for the subscription you want to use
# (useful if you have access to several subscriptions)
az account list --output table

# Set your active subscription
az account set --subscription "<your-subscription-id>"

# Check the accounts list again, make sure that your subscription is active
# (IsDefault should be true)
az account list --output table
Managed online endpoints
Now, you may be wondering, what exactly is an online endpoint? Well, the docs have a pretty good explanation:
An endpoint, in this context, is an HTTPS path that provides an interface for clients to send requests (input data) and receive the inferencing (scoring) output of a trained model. An endpoint provides:
- Authentication using “key & token” based auth
- SSL termination
- A stable scoring URI (endpoint-name.region.inference.ml.azure.com)
So, basically, a web API. An API that receives a request, ideally using a JSON payload, translates it to something your model can understand, hands it over to the model to generate predictions, and returns the predictions to the caller, ideally using a JSON payload as well. It’s the glue between your model and the clients of your API.
This means we’ll need three things - an inference script to handle all that input/output stuff, a deployment to describe the environment in which the script will run, and an endpoint which will expose the deployment to the whole wide world. Let’s see how to create them.
The inference script
The script responsible for processing the client’s inputs and the model’s outputs is called an inference script, and it’s quite straightforward. For starters, Azure ML expects it have at least two methods, init and a run:
initwill only be called when the container is started, as it’s meant for loading your model into memory and doing the kind of time-consuming tasks you only want to do when the application starts. You can kinda get away with it being slow (but not too slow 😉).runwill, well, run each time someone invokes your api. It’s meant to translate the API inputs to something your model ca handle, invoke the model and return the formatted results. Needless to say, you need to make this fast, as fast as possible.
Here’s a very basic example:
# score.py

import os
import logging
import json
import numpy
import joblib


def init():
    """
    This function is called when the container is initialized/started, typically after creation/update of the deployment.
    You can write the logic here to perform init operations like caching the model in memory
    """
    global model
    # AZUREML_MODEL_DIR is an environment variable created during deployment.
    # It is the path to the model folder (./azureml-models/$MODEL_NAME/$VERSION)
    # You'll need to provide your model's folder name if there is one
    model_path = os.path.join(
        os.getenv("AZUREML_MODEL_DIR"), "model/sklearn_regression_model.pkl"
    )

    # Deserialize the model file back into a sklearn model
    model = joblib.load(model_path)
    logging.info("Init complete")


def run(raw_data):
    """
    This function is called for every invocation of the endpoint to perform the actual scoring/prediction.
    In the example we extract the data from the json input and call the scikit-learn model's predict()
    method and return the result back
    """
    logging.info("model 1: request received")
    data = json.loads(raw_data)["data"]
    data = numpy.array(data)
    result = model.predict(data)
    logging.info("Request processed")
    return result.tolist()
The endpoint
Conceptually, an endpoint sits between the clients of your API and the deployments. This means you can do all sorts of fun stuff like including multiple versions of the same model or even multiple models answering queries and generating predictions, all within the same endpoint. This is all transparent to the clients of your API, they just need to know the endpoint’s URL and they’re good to go.
To create a managed online endpoint with CLI v2 you first need to describe it, and the way to describe it is by using a yaml file. Here’s a simple example:
$schema: https://azuremlschemas.azureedge.net/latest/managedOnlineEndpoint.schema.json

name: whats-in-a-name
auth_mode: key
As you can see, there’s not a lot going on in here, all we do is give it a name and set the authentication mode to Bearer tokens. Remember, you can also use AML access tokens if you need more control over the token expiration dates, check out the schema here.
Once you created this file, all you need to do is run az ml online-endpoint create with it as a argument and Presto!, you have an endpoint:
az ml online-endpoint create -f endpoint.yml -g "<your-resource-group>" -w "<your-workspace>"
The deployment
Before I mentioned that deployments are used to describe the environment in which the script will run, so let’s expand on that – a deployment is a containerized environment that runs your inference script. It’s basically a Docker image with a web server running your inference script, and all the dependencies it needs to run.
Here’s how we might describe it using a yaml file (full schema is available here):
$schema: https://azuremlschemas.azureedge.net/latest/managedOnlineDeployment.schema.json
name: blue
endpoint_name: whats-in-a-name
model:
  path: ../../model-1/model/
code_configuration:
  code: ../../model-1/onlinescoring/
  scoring_script: score.py
environment:
  conda_file: ../../model-1/environment/conda.yml
  image: mcr.microsoft.com/azureml/openmpi3.1.2-ubuntu18.04:20210727.v1
instance_type: Standard_DS2_v2
instance_count: 1
A bit more going on here, but not by much. Let’s break it down:
- We’re setting a name for the deployment (
blue) and reference the endpoint we created earlier (whats-in-a-name). - We reference a local folder containing the model (
../../model-1/model/). This folder will be uploaded to the deployment’s container and will be available in the inference script asAZUREML_MODEL_DIR.- What happens if you only want to test out your script and don’t have a model yet? Well, the simplest thing would be to upload a file, any file, and just ignore it in the scoring script.
- We point out the inference script (
score.py) and it’s parent folder (../../model-1/onlinescoring/). This folder will be uploaded as well to the container, and the inference script will be executed from it. - We describe the container too – the image (
mcr.microsoft.com/azureml/openmpi3.1.2-ubuntu18.04:20210727.v1) it’ll be running, and also the dependencies it’ll need to run the inference script, expressed as a conda file (../../model-1/environment/conda.yml). - Lastly, we set the type of VM that will be used to run the container, and the number of instances. I’m using
Standard_DS2_v2which is a jack-of-all-trades kind of instance, but you might want something different so read more about the different instance types here.
Once you have this file, you can create the deployment by running:
az ml online-deployment create -f blue-deployment.yml -g "<your-resource-group>" -w "<your-workspace>"
And also update the endpoint to allocate 100% of the traffic to the new deployment:
az ml online-endpoint update -n whats-in-a-name --traffic "blue=100" -g "<your-resource-group>" -w "<your-workspace>"
(You could, of course, create multiple deployments and allocate traffic to them as you see fit, but let’s keep it simple for now.)
Connecting to a managed endpoint
Now that we have an endpoint with an deployment, we can connect to them and start sending requests. To do that, we’ll need to get the endpoint’s URL and its authentication token. We can get the inference URL by running:
az ml online-endpoint show -n whats-in-a-name -g "<your-resource-group>" -w "<your-workspace>" --query "scoring_uri"
It will look something like https://<deployment-name>.<azure-location>.inference.ml.azure.com/score.
The authentication token can be retrieved by running:
az ml online-endpoint get-credentials -n whats-in-a-name -g "<your-resource-group>" -w "<your-workspace>" --query "primaryKey"
Their power combined, you can now send requests to the endpoint 🥳:
curl <your-inference-url> -H 'Authorization: Bearer <your-token>' -H 'Content-Type: application/json' --data-binary @sample-request.json
Conclusion
Deploying machine learning models in production isn’t always the most straightforward thing to do, especially if you’re thinking about such pesky things as security, scalability, and reliability.
Luckily, we’ve seen how to handle them with the help of managed online endpoints. Want security? Just use AML access tokens. Want scalability? Just create multiple deployments and allocate traffic to them as you see fit. Want reliability? Just use the managed online endpoint’s built-in load balancer.
Anyways, I hope you enjoyed this post and you found it useful. If you have any questions or comments, feel free to reach out to me on Mastodon:
Deploying machine learning models in production isn’t always the most straightforward thing to do, especially if you’re thinking about pesky things such as security, scalability, and reliability.
This is why I wrote a short(-ish😊) quickstart on deploying models with #AzureML managed online endpoints which solve "production" concerns like the ones above.
Read it here: https://vladiliescu.net/aml-managed-endpoints-quickstart/ and let me know what you think.